
Good outdoor lighting changes everything. It extends your living space, highlights landscaping you worked hard on, and makes pathways safer after dark. The best part? You don’t need an electrician or a four-figure budget to pull it off. Most outdoor lighting projects fall into the DIY-friendly category, no permits, no complex wiring, and plenty of room for creativity. Whether you’re stringing lights over a deck, lining a walkway with solar stakes, or rigging up custom lanterns, the skills required are minimal and the results immediate. This guide walks through the most practical, beginner-friendly outdoor lighting projects, with real talk about tools, materials, and what actually works.
Table of Contents
ToggleKey Takeaways
- DIY outdoor lighting delivers high visual impact at minimal cost—string lights can start under $50 and take just an hour, while professional installations often exceed $1,000.
- Solar pathway lights and string lights require no electrical permits in most jurisdictions and are inherently safer than household 120V circuits, making DIY outdoor lighting accessible for beginners.
- Low-voltage systems (12V or 24V) offer reliable brightness without the complexity of line-voltage work, allowing you to uplift trees, illuminate gardens, and expand designs over time.
- Proper planning—measuring distances, choosing weatherproof components, and testing before final fastening—prevents costly mistakes and ensures your outdoor lighting setup lasts through seasons.
- Solar lights need 6+ hours of direct sunlight and perform poorly in shaded areas, while low-voltage wired systems provide year-round reliability for consistently bright outdoor lighting regardless of weather or shade.
Why DIY Outdoor Lighting Is Worth Your Time
Outdoor lighting hits a sweet spot in the DIY world: high visual impact, low technical difficulty, and costs that scale with your budget. A basic string light setup can run under $50 and take an hour. A more ambitious low-voltage landscape system might cost $200–$400 and a weekend, but it still beats paying a contractor $1,000+ for the same result.
Beyond the money, DIY gives you control. You choose fixture styles, adjust light placement as your landscaping evolves, and troubleshoot without waiting on a service call. Most outdoor lighting systems use low-voltage DC current (12V or 24V) or battery/solar power, which means they’re inherently safer than household 120V circuits. You’re not dealing with junction boxes, conduit runs, or NEC compliance in most cases.
The projects outlined here require no electrical permit in most jurisdictions, though it’s always smart to check local codes if you’re tapping into existing exterior outlets or running new circuits. For renters or anyone planning to move, the portability factor matters, string lights and solar stakes come with you.
Essential Tools and Materials for Outdoor Lighting Projects
Most outdoor lighting projects share a common toolkit. Here’s what to have on hand:
Tools:
- Cordless drill/driver with bits for pilot holes and screws
- Wire strippers and cutters (if working with low-voltage systems)
- Tape measure and chalk line for layout
- Level (a 2-foot torpedo level works fine)
- Pliers and adjustable wrench
- Voltage tester or multimeter (low-voltage testers are under $15)
- Post-hole digger or garden auger (for pathway stakes or posts)
- Ladder (6-foot stepladder or extension ladder depending on install height)
Materials (project-dependent):
- Outdoor-rated electrical wire (14-gauge or 12-gauge for low-voltage runs)
- Wire connectors (silicone-filled waterproof types)
- Mounting hardware (stainless steel screws, eye hooks, cable clamps)
- Cable staples or conduit clips
- Ground stakes (for string lights and pathway fixtures)
- Weatherproof extension cords (SJTW or SJEOW jacket, 14-gauge or heavier)
Safety Gear:
- Safety glasses (always, especially when drilling overhead)
- Work gloves (for handling wire, stakes, and sharp hardware)
- Headlamp or work light (you’ll often work at dusk to test placement)
Having everything staged before you start prevents mid-project runs to the hardware store. Buy a few extra connectors and a spare bulb or two, they’re cheap insurance.
String Light Installations: The Easiest Way to Add Ambiance
String lights deliver the most bang for the buck. They’re forgiving to install, widely available, and instantly create the kind of ambiance that takes a backyard from functional to inviting.
Choosing the Right String Lights:
Look for outdoor-rated Edison bulb strings (E26 or E12 socket) or integrated LED café lights. Edison-style bulbs are replaceable: integrated LED strings are more energy-efficient but you replace the whole strand if one section fails. For permanent installations, opt for commercial-grade strings with 14-gauge wire and weatherproof sockets (IP65 rating or better).
Installation Steps:
- Plan the layout. Sketch your run and measure the distance. Most strings come in 25-foot or 50-foot sections. Account for the distance from your outlet to the first anchor point.
- Install anchor points. Use eye hooks screwed into fascia boards, posts, or trees (stainless steel or galvanized to prevent rust). If spanning open areas, set 4×4 posts in concrete using post-hole digger and gravel base for drainage.
- String the lights. Start at the power source and work outward. Use a helper for long runs. Keep the wire taut but not stretched, allow a slight catenary (droop) for a natural look.
- Secure the cable. Use cable clamps or guide wire (12-gauge galvanized wire) to support the string lights. Don’t rely on the electrical wire to bear its own weight over long spans: it’ll sag and strain the connections.
- Test before final fastening. Plug in and check for dead bulbs or loose connections.
For covered patios, screw hooks directly into joists (locate with a stud finder). For open yards, posts spaced 15–20 feet apart work well. If you’re creating elaborate patterns, reviewing outdoor living design ideas can help with layout inspiration. Never run string lights through tree branches that move in wind, the abrasion will damage the wire jacket over time.
Solar-Powered Pathway Lights: No Wiring Required
Solar pathway lights are the no-commitment option. They install in minutes, require zero wiring, and cost as little as $2–$5 per fixture. They’re ideal for renters, first-time DIYers, or anyone testing layout ideas before committing to a wired system.
What to Look For:
Not all solar lights are equal. Cheap units use NiCd batteries that degrade fast. Look for models with NiMH or lithium-ion batteries, monocrystalline solar panels (more efficient than polycrystalline), and lumens ratings of 5–15 per fixture. Anything under 5 lumens is decorative at best.
Installation Process:
- Choose your spacing. For pathways, place lights 6–8 feet apart on alternating sides or 4–6 feet apart on one side. For driveways, tighter spacing (4 feet) improves visibility.
- Prep the ground. If soil is hard or rocky, pre-drill pilot holes with a steel rod or long screwdriver. This prevents bending the stakes.
- Install the fixtures. Push stakes straight down until the solar panel sits just above ground level. Tilt panels slightly south (in the Northern Hemisphere) for maximum sun exposure.
- Test after dark. Most solar lights have an on/off switch under the cap. Turn them on and leave them in sunlight for 1–2 days to fully charge before judging performance.
Limitations:
Solar lights need 6+ hours of direct sunlight to charge fully. Shaded yards, tree cover, or north-facing slopes will underperform. Batteries typically last 1–3 years before replacement. In winter, shorter days and low sun angles reduce runtime. For consistently bright, year-round lighting, low-voltage wired systems are more reliable.
Creating Custom Mason Jar and Lantern Lights
Custom lanterns and mason jar lights add personality and work well for tabletop, hanging, or accent lighting. They’re a good entry point if you want to combine basic wiring with a bit of creative flair.
Mason Jar Pendant Lights:
You’ll need quart-size mason jars, pendant light kits (socket, cord, and canopy), and Edison bulbs or LED filament bulbs. Kits are available at most hardware stores for $8–$12 each.
- Drill the lid. Use a 7/8-inch spade bit or hole saw to cut a centered hole in the jar lid. Drill slowly to prevent cracking.
- Thread the socket. Insert the threaded socket stem through the hole and secure with the included locknut. The socket should sit just below the jar opening.
- Wire the socket. Follow the kit instructions, usually black (hot) to brass screw, white (neutral) to silver screw, green (ground) to the green screw on the socket. Turn off power at the breaker if hardwiring to an existing junction box.
- Assemble and hang. Screw the jar onto the lid, install the bulb, and hang from the canopy.
For outdoor use, choose weatherproof pendant kits or install these under a covered porch. Mason jars aren’t rated for wet locations. Many of the most creative approaches to this style of project can be found through step-by-step tutorials that walk through different bulb and jar combinations.
Battery-Powered Lanterns:
For portable or non-wired applications, use battery-operated LED fairy lights or puck lights inside lanterns or jars. These are safer for tabletop use, kid-friendly events, and locations without outlets. Look for models with timers (auto on/off) and remote controls for convenience.
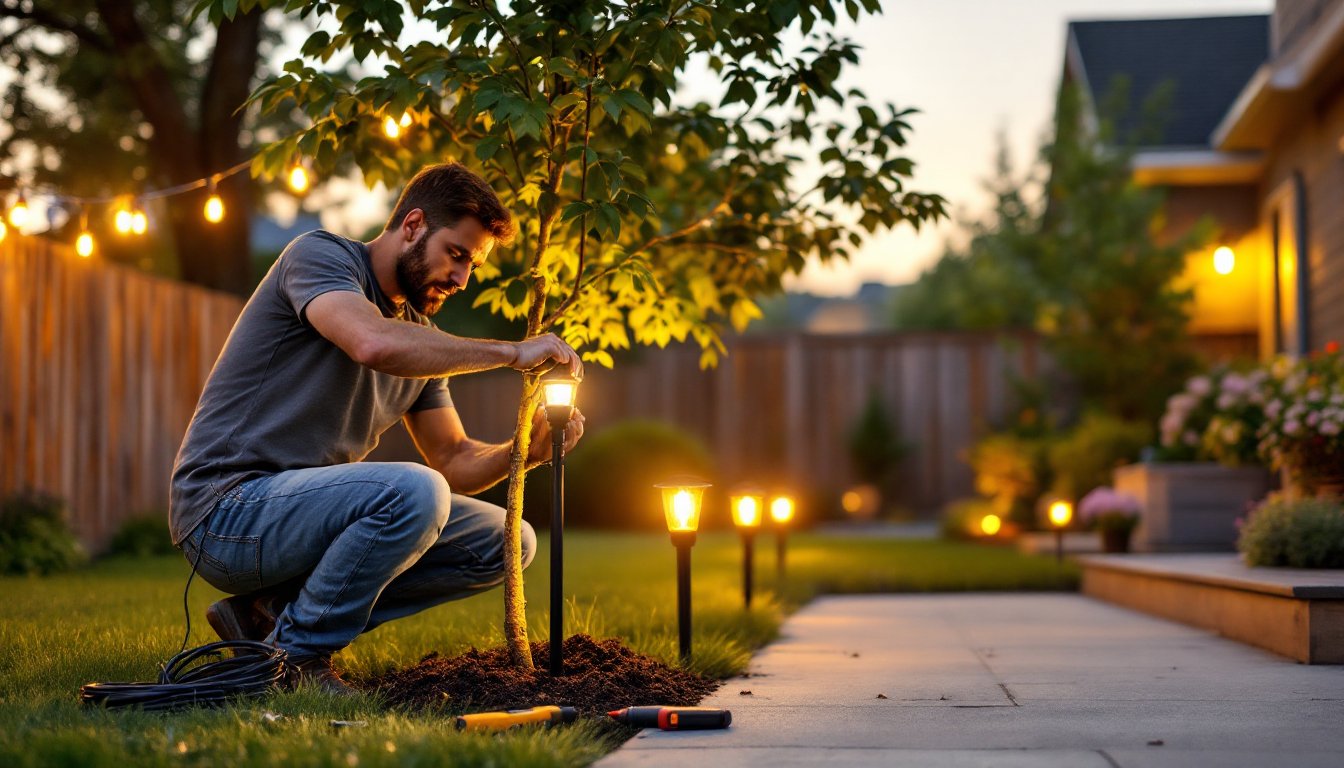
Low-Voltage Landscape Lighting Systems for Beginners
Low-voltage systems (12V or 24V) offer the reliability and brightness of wired lighting without the danger and complexity of line-voltage work. They’re perfect for uplighting trees, washing walls, or illuminating garden beds.
System Components:
- Transformer: Converts 120V AC to 12V DC. Size it to handle your total wattage plus 20% overhead. A 200-watt transformer handles about 16 fixtures at 10 watts each.
- Low-voltage cable: 12-gauge or 14-gauge direct-burial wire. Heavier gauge reduces voltage drop over long runs.
- Fixtures: Spotlights, well lights, path lights, choose based on beam angle and lumen output.
- Connectors: Silicone-filled waterproof wire connectors or proprietary quick-connect fittings.
- Timer or photocell: Automates on/off cycles.
Installation Steps:
- Mount the transformer. Install near a GFCI-protected outdoor outlet, at least 12 inches above grade. Most transformers have keyhole slots for screw mounting to siding or a post.
- Lay out the cable. Run the low-voltage wire along your planned fixture locations. Bury it 6 inches deep in a shallow trench (check local codes, some areas allow surface mounting under mulch).
- Connect fixtures. Strip 1/2 inch of insulation, insert wires into connectors, and attach fixtures. Follow the manufacturer’s connection method, some use quick-connect clamps, others require twist-on connectors.
- Test the system. Plug in the transformer and check each fixture. Use a multimeter to measure voltage at the farthest fixture, it should read 10.8V–12V. If it’s below 10.5V, you have voltage drop: upgrade to heavier gauge wire or shorten the run.
- Adjust and bury. Fine-tune fixture angles, then backfill the trench and tamp down.
Pro Tips:
- Run multiple wire legs from the transformer instead of one long daisy chain. This reduces voltage drop.
- Use T-connectors to split runs without cutting the main cable.
- Choose fixtures with adjustable stakes and swivel heads for flexibility as plants grow.
Many landscape lighting designs benefit from layering, path lights for safety, uplights for focal points, and downlights for ambient fill. Exploring examples of garden and landscape lighting can help visualize how to balance these elements. Low-voltage systems can be expanded over time, so start small and add fixtures as budget allows.
Conclusion
Outdoor lighting doesn’t require a contractor or a hefty budget, just a willingness to measure twice, test thoroughly, and work methodically. String lights and solar stakes get you started in an afternoon. Low-voltage systems and custom lanterns open up more ambitious possibilities without crossing into electrician territory. Start with one project, see what works in your space, and build from there. The yard you use after dark is the yard you’ll actually enjoy.


