
Solar lighting has changed the game for backyard upgrades. No trenching for electrical lines, no permit hassles, and zero added cost to the monthly power bill. Whether someone’s lighting a flagstone path, creating evening ambiance on a deck, or adding security around a shed, solar fixtures now offer enough variety and output to handle most residential outdoor lighting needs. The technology has improved dramatically, modern solar panels charge faster, batteries hold longer, and LED output rivals low-voltage wired systems. This guide covers practical solar lighting applications, from basic pathway markers to creative DIY projects that add function and character to outdoor spaces.
Table of Contents
ToggleKey Takeaways
- Backyard solar lighting ideas require zero installation complexity—no electrician, permits, or trenching needed, with most fixtures taking under five minutes to install with a ground stake or mounting bracket.
- Modern solar lighting technology has dramatically improved with faster-charging panels, longer-lasting batteries (2000mAh or higher), and LED output that rivals low-voltage wired systems, delivering 8–12 hours of runtime on a single charge.
- Pathway and walkway solar lighting solutions include stake-mounted path lights (10–15 lumens), flush-mount pavers for walkways and steps, and bollard-style options for gravel paths, with mid-tier fixtures lasting 3–5 years in full weather exposure.
- Solar string lights and decorative options like lanterns and globes require at least 6 hours of direct daily sunlight and perform best when the solar panel is positioned separately where it captures full sun, not under covered patios or eaves.
- Motion-activated solar floodlights deliver 800–1200 lumens for security around sheds and garages, while portable solar lanterns and task-lighting fixtures (300+ lumens) handle outdoor dining, grills, and work areas.
- Proper maintenance—cleaning panels every 2–3 months, replacing batteries every 1–2 years, and winterizing lights below freezing—maximizes performance and longevity of your backyard solar lighting setup.
Why Choose Solar Lighting for Your Backyard?
Solar fixtures eliminate installation complexity. There’s no need to hire an electrician, pull permits for low-voltage wiring, or dig trenches across a lawn. Most solar lights install with a ground stake or mounting bracket, total setup time is usually under five minutes per fixture.
Operating costs stay at zero. Once installed, solar lights draw no power from the grid. A typical solar path light uses a 1.2V NiMH battery recharged daily by a small photovoltaic panel. Over a 3–5 year lifespan, that’s hundreds of kilowatt-hours saved compared to wired equivalents.
Flexibility beats hardwired systems. Seasonal adjustments are simple, move lights to highlight a new planting bed in spring, then relocate them to a fire pit area in fall. Hardwired fixtures require cutting power and rewiring: solar lights just pull up and replant.
Modern solar performance handles real-world conditions. Quality units now charge even on overcast days, thanks to improved monocrystalline panels. Battery capacity has jumped from 600mAh in older models to 2000mAh or higher in current mid-range fixtures, extending runtime from 4–6 hours to 8–12 hours on a full charge.
One limitation: shaded yards struggle with solar. If mature trees block direct sun for most of the day, consider thinning canopy or choosing wired lighting for those zones. Solar works best with at least 6 hours of direct sunlight on the panel.
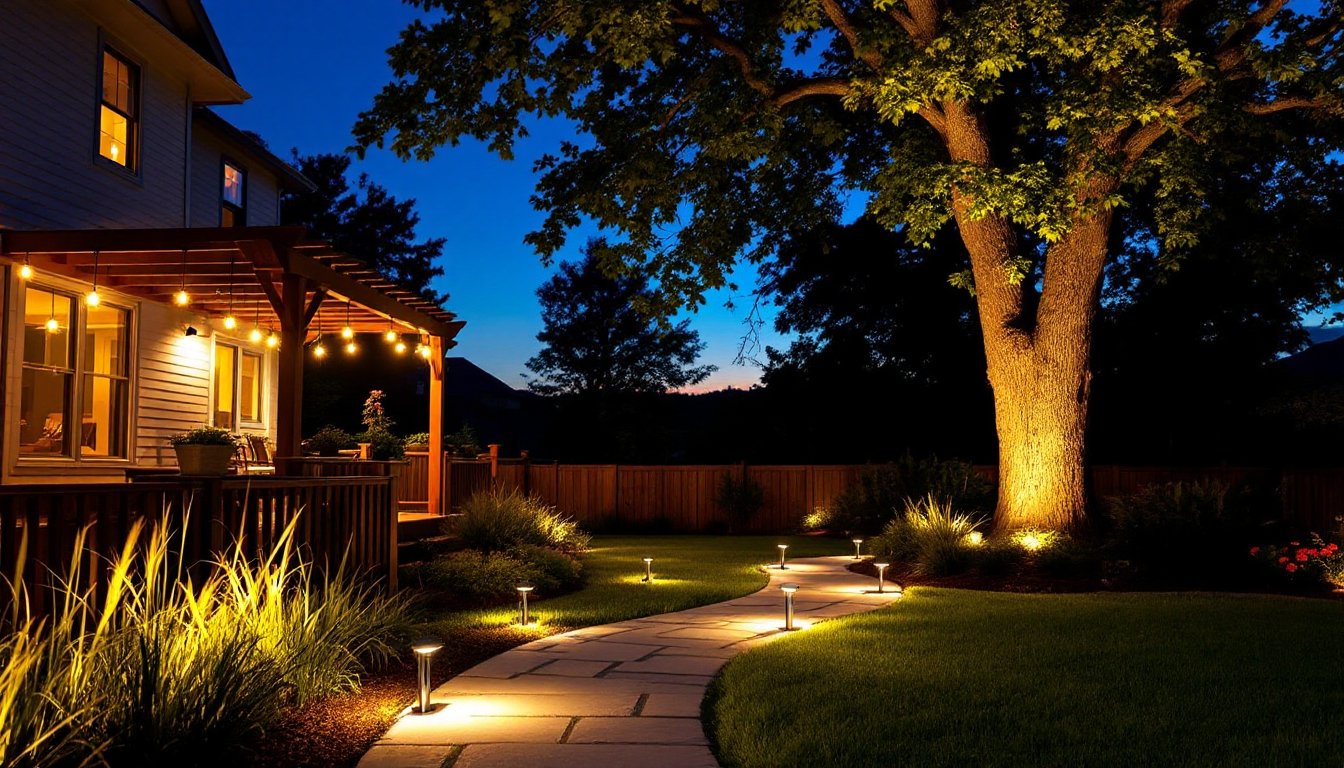
Pathway and Walkway Solar Lighting Solutions
Stake-mounted path lights are the workhorse for driveways, sidewalks, and garden trails. Standard units stand 10–15 inches tall and space 6–8 feet apart along the edge of a path. Look for fixtures with at least 10–15 lumens per light, enough to define edges without creating harsh pools of light.
For gravel or mulch paths where stakes don’t hold well, bollard-style solar lights with wider bases offer better stability. These sit 18–24 inches tall and work well along outdoor entertaining areas where a bit more height prevents trip hazards near seating.
Flush-mount solar pavers embed directly into walkways. They’re cast in heavy-duty plastic or tempered glass and rated to handle foot traffic (some models support vehicle weight up to 2 tons). Installation requires cutting or forming a recess in the path surface, usually a 4×4-inch or 6×6-inch square, and setting the unit flush with surrounding pavers or concrete. These work particularly well on steps, where side-mounted path lights leave gaps in coverage.
Brick or stone-style solar lights mimic natural materials and blend into hardscaping. They’re molded to resemble granite, limestone, or clay pavers but house a solar cell on top and LEDs on the sides. Useful along retaining walls or garden bed edges where decorative lighting doubles as a design element.
Avoid the cheapest plastic stake lights, they crack after one winter freeze-thaw cycle. Mid-tier fixtures with metal stakes and UV-resistant housings last 3–5 years in full weather exposure. Check that the solar panel is replaceable: it’s often the first component to degrade.
Ambient and Decorative Solar Lighting Options
Lantern-style solar lights bring vintage or cottage aesthetics to patios and porches. They’re available as tabletop models, hanging pendants, or shepherd’s hook fixtures. Most use warm white LEDs (2700–3000K) to mimic incandescent bulbs. The solar panel typically sits on the lantern top, so they need overhead clearance, don’t tuck them under deep eaves or pergola roofs that block sun.
Spotlights and uplights accent trees, architectural features, or focal plantings. Solar spotlights now reach 200–400 lumens, enough to wash light up a medium tree trunk or highlight a stone veneer wall. Adjust the angle with a swivel mount, and use the ground stake or screw-mount bracket depending on the install surface. These work best with direct sun on the panel: adding a separate panel with a 10–15 foot cable lets the fixture sit in shade while the panel captures sun elsewhere.
Globe and orb lights add soft ambient fill to garden design layouts. They range from 6-inch diameter spheres to 16-inch statement pieces. Place them along bed edges, near water features, or clustered in groups of three for asymmetric visual weight. The diffused LED inside creates even illumination without hot spots.
String Lights and Fairy Lights
Solar string lights drape across pergolas, fences, or between posts to define outdoor rooms. Standard sets run 20–50 feet with bulb spacing every 12–18 inches. The solar panel mounts separately on a stake or clips to a rail where it gets full sun, don’t expect the panel to charge properly if the string runs under a covered patio.
Look for lights with replaceable bulbs. Cheaper sets have LEDs permanently wired in: when one fails, the whole section goes dark. Mid-range and higher models use Edison-base or bayonet-mount bulbs that swap out individually.
Battery capacity matters for runtime. A set with a 2000mAh battery runs 6–8 hours: 3000mAh models push 10–12 hours. If a space needs light past midnight, choose larger batteries or consider a small solar panel array with a dedicated battery box and timer.
Weather resistance is often overstated. Check for an IP65 rating or higher, IP44 is splash-resistant but won’t survive a soaking rain or snow load. Store string lights indoors during winter in climates with hard freezes: the solder joints on bulb sockets crack in extreme cold.
Functional Solar Lighting for Outdoor Activities
Motion-activated solar floodlights add security around garage doors, sheds, or side gates. Modern units deliver 800–1200 lumens for 30–60 seconds per trigger. They use passive infrared (PIR) sensors with detection ranges of 20–30 feet and a 120-degree field of view. Mount them 8–10 feet high for optimal coverage, too low and they’ll trigger on pets or wildlife: too high and the sensor range drops.
Separate the solar panel from the floodlight body if the mounting location is shaded. Most quality units include a 16-foot cable between panel and fixture, letting the panel sit on a sunny roof edge while the light covers a shaded walkway.
Solar deck and step lights prevent trips on stairs and level changes. Flush-mount models install into deck boards, post caps, or stair risers. Drill a hole sized to the fixture (typically 2.5–3 inches diameter), drop the light in, and secure with the retaining clip. These are low-output, usually 2–5 lumens, but that’s enough to define edges in the dark.
Task lighting for grills and work areas requires higher output. Solar spotlights rated at 300+ lumens and mounted on adjustable arms provide hands-free light over a grill, potting bench, or outdoor sink. Some models include a pull-chain or remote switch to toggle on/off rather than relying on dusk-to-dawn sensors.
Portable solar lanterns serve camping-style needs, light for outdoor dining, reading on a screened porch, or emergency backup. Collapsible models pack flat and inflate to diffuse the LED. They charge in 6–8 hours of sun and run 10–15 hours on low, 4–6 hours on high. Hang them from a tree branch, set them on a picnic table, or carry them around the yard.
Creative DIY Solar Lighting Projects
Mason jar solar lids convert standard canning jars into hanging lanterns. The lid assembly includes a small solar panel, LED, and battery, usually a 1.2V 600mAh cell. Screw it onto a quart or pint jar, add decorative elements like colored glass beads or sand, and hang with jute twine or wire. These make quick accents for party or event lighting.
Solar post cap lights retrofit onto existing fence posts or deck railings. Standard caps fit 4×4-inch or 6×6-inch posts (actual dimensions 3.5×3.5 or 5.5×5.5 inches). Remove the old cap, slide the solar unit in place, and secure with screws through the side flanges. Some DIYers build custom post caps from cedar or composite, then embed small solar paver lights into the top surface.
Repurposed solar fixtures in planters combine light with greenery. Stake a solar path light into a large container planter, plant around the base with trailing or compact annuals, and the fixture becomes part of the arrangement. Choose lights with detachable stakes so the solar panel sits above foliage and captures sun.
Homemade solar chandelier uses a wire basket or metal frame as structure. Attach multiple small solar path lights or LED puck lights (with panels removed and wired to a central solar panel). This is advanced DIY, requires basic wiring skills and weatherproof sealant on all connections. Suspend the assembly from a pergola beam or tree branch with galvanized chain.
Solar-lit address signs improve nighttime visibility. Build or buy a wooden or metal address plaque, then mount small solar spotlights on the back or sides angled to illuminate the numbers. Use reflective or light-colored number decals for better contrast.
Tips for Installing and Maintaining Solar Lights
Site selection determines performance. Place the solar panel where it receives at least 6 hours of direct sun daily. Morning and midday sun is more effective than late afternoon, panels charge best when the sun is higher in the sky. Avoid spots near porch lights or street lamps: artificial light at night tricks the sensor into staying off.
Clean panels seasonally. Dust, pollen, and bird droppings cut charging efficiency by 20–40%. Wipe panels with a damp microfiber cloth every 2–3 months. Stubborn grime comes off with a 50/50 mix of water and white vinegar.
Replace batteries every 1–2 years. Rechargeable NiMH or lithium-ion cells degrade with charge cycles. When runtime drops noticeably, lights going dim after 3–4 hours instead of 8, the battery is likely spent. Most units use standard AA or AAA rechargeable cells available at hardware stores. Match voltage and capacity to the original spec.
Winterize in cold climates. Freezing temps below 0°F damage batteries and crack plastic housings. In zones 5 and colder, pull solar lights indoors from November through March. Store them in a garage or basement with batteries removed to prevent corrosion.
Adjust sensor sensitivity if lights false-trigger. Motion-activated units often have a dial or switch for detection range. Turn it down in high-traffic areas where passing cars or neighbors’ dogs set off the light constantly.
Test new lights before permanent install. Set them in full sun for two days, then check performance at night. If a light doesn’t turn on or stays dim, return it, don’t waste time troubleshooting a defective unit during the return window.


