
Brass recessed lighting has made a strong comeback in residential interiors, blending the clean lines of modern lighting with the warm character of traditional metalwork. Unlike the ubiquitous white or brushed nickel trims that dominated for decades, brass brings visual warmth and a touch of sophistication without overwhelming a room’s design. Whether you’re renovating a dated ceiling or designing new construction, brass recessed fixtures offer versatility across styles, from mid-century modern to contemporary farmhouse. This guide walks through everything from fixture selection and installation to maintenance, helping homeowners integrate brass recessed lighting with confidence.
Table of Contents
ToggleKey Takeaways
- Brass recessed lighting adds warmth and sophistication to any room, offering a balanced aesthetic that complements both modern and traditional design styles without overwhelming the space.
- Choose between new construction housings, remodel housings for finished ceilings, and ultra-low-profile LED fixtures depending on your ceiling depth and installation needs.
- Proper spacing and placement are critical—position brass recessed lights 4–5 feet apart for general illumination, closer over islands for task lighting, and align them with architectural features for a polished look.
- Installation requires running electrical cable, securing housings with spring clips, and attaching brass trim rings; always verify local electrical codes and consider hiring a licensed electrician if unfamiliar with wiring.
- Maintain brass recessed lighting with monthly dusting and periodic deep cleaning; lacquered brass requires gentle polishing, while unlacquered brass develops patina naturally over time for an authentic vintage aesthetic.
- Layer brass recessed lights with other light sources like sconces and pendants, and match the warm color temperature of your bulbs (2700K–3000K) to the brass finish for visual cohesion.
What Is Brass Recessed Lighting and Why Choose It?
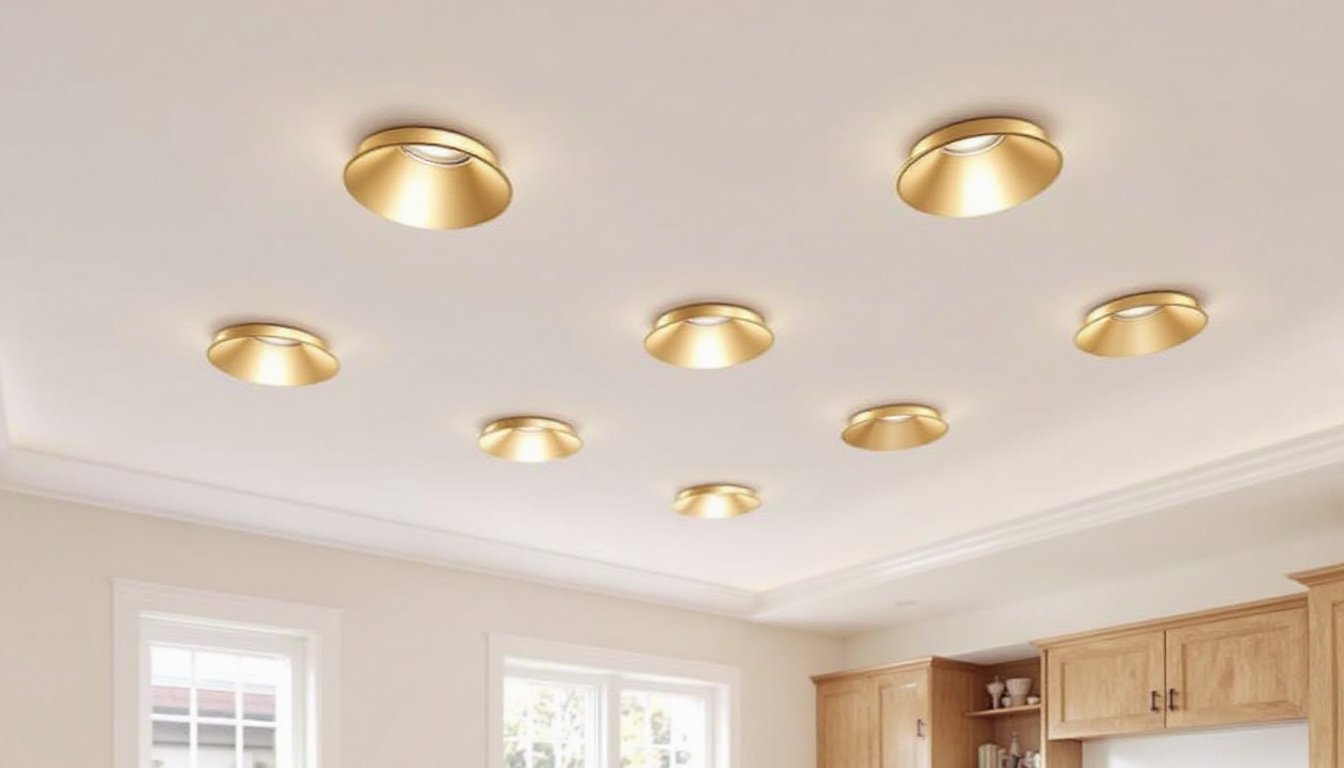
Brass recessed lighting refers to can lights or downlights with visible trim rings, baffles, or bezels finished in brass, typically polished brass, antique brass, or satin brass. The housing itself remains hidden in the ceiling cavity, while the brass trim provides the aesthetic accent.
The appeal lies in brass’s ability to add warmth without competing with other design elements. Where white trims disappear into the ceiling and dark finishes create contrast, brass offers a middle ground: noticeable but not dominant. It pairs well with wood cabinetry, natural stone, and both cool and warm color palettes.
Brass also ages gracefully. Unlacquered brass develops a patina over time, which some homeowners prefer for an authentic vintage look. Lacquered or PVD-coated brass maintains its original shine with minimal upkeep. Either way, the material reads as intentional and high-quality, elevating perceived finishes throughout a space.
From a practical standpoint, brass recessed fixtures function identically to other trims. They accommodate LED, halogen, or incandescent bulbs (where still code-compliant), work with dimmers, and install using standard IC-rated or non-IC housings depending on ceiling insulation contact.
Types of Brass Recessed Lighting Fixtures
Brass recessed lighting comes in several configurations, each suited to different applications and ceiling conditions.
New Construction Housings mount directly to ceiling joists before drywall goes up. These fixtures include adjustable bars that span between joists (typically 16″ or 24″ on center) and allow precise positioning. Choose IC-rated (insulation contact) housings if insulation will touch the fixture: non-IC housings require 3″ clearance from insulation to prevent overheating.
Remodel (Old-Work) Housings install into finished ceilings through a circular cutout. Spring-loaded clips grip the drywall from above, eliminating joist access requirements. Most remodel cans are IC-rated by default. These are the go-to for retrofit projects where ceiling access is limited.
Shallow or Canless LED Fixtures have gained popularity in homes with limited ceiling depth or tight attic clearances. These ultra-low-profile units mount directly to the drywall with only 2″–3″ of vertical clearance, and the integrated LED module eliminates the need for a separate bulb. Brass trim rings attach magnetically or via twist-lock mechanisms.
Gimbal and Eyeball Trims allow the light source to pivot and aim, useful for highlighting artwork or architectural features. Brass gimbal trims blend task lighting function with decorative finish.
Baffle vs. Reflector Trims: Baffle trims (ribbed interior) reduce glare and create softer light pools. Reflector trims (smooth interior) maximize brightness and throw, ideal for task zones. Both are available in brass finishes, so choose based on lighting need rather than aesthetics alone.
Where to Use Brass Recessed Lighting in Your Home
Brass recessed lights excel in spaces where metal accents already appear or where warmth is desired.
Kitchens are a natural fit, especially when paired with brass cabinet hardware, faucets, or range hoods. Position fixtures 18″–24″ from wall cabinets to minimize shadows on countertops. Space cans 4’–5′ apart for even general illumination, or closer (3′ apart) over islands and peninsulas where task lighting is critical.
Bathrooms benefit from brass trims around vanities and above showers (use wet-location-rated housings). Brass complements marble, ceramic tile, and wood vanities. Keep fixtures at least 3′ away from tub edges unless rated for damp locations per NEC guidelines.
Living Rooms and Bedrooms use brass recessed lighting to layer ambient light with table lamps and sconces. Dimmable LEDs allow mood adjustment. Consider placing fixtures to graze textured walls or frame seating areas, rather than centering them in the ceiling grid.
Hallways and Entryways gain visual interest from brass trims, which elevate otherwise utilitarian spaces. Space fixtures 6’–8′ apart in hallways: in entryways, position them to light the threshold and any art or millwork.
Avoid over-lighting: recessed fixtures work best as part of a layered lighting design that includes ambient, task, and accent sources. Too many cans create a commercial feel, regardless of finish.
How to Install Brass Recessed Lighting (Step-by-Step)
Installing brass recessed lighting follows standard electrical and carpentry practices. This guide covers remodel installations, the most common DIY scenario. Always turn off power at the breaker and verify with a non-contact voltage tester before starting.
Tools and Materials
- Remodel IC-rated housing (4″, 5″, or 6″ aperture)
- Brass trim kit compatible with housing
- Drywall saw or hole saw
- Wire strippers, screwdrivers, wire nuts
- Non-contact voltage tester
- Headlamp or work light
- 14/2 or 12/2 NM-B cable (depending on circuit amperage)
- Cable clamps and staples
- Safety glasses and dust mask
Step-by-Step Process
-
Plan fixture locations. Mark ceiling positions with painter’s tape. Use a stud finder to avoid joists. Space fixtures according to room function (see previous section).
-
Cut ceiling openings. Trace the housing template (usually provided) or use the remodel housing itself as a guide. Cut carefully with a drywall saw to avoid ragged edges. Wear a dust mask: cutting drywall kicks up fine particles.
-
Run electrical cable. From an existing junction box or switch, fish 14/2 NM-B cable (for 15-amp circuits) through the ceiling cavity to each fixture location. Leave 12″–18″ of slack at each opening. Staple cable within 8″ of boxes and every 4.5′ along runs per NEC 334.30. If you’re uncomfortable with electrical work or if code requires a licensed electrician, hire one. Many jurisdictions require permits for new circuit work.
-
Install housings. Remove the housing’s knockout and secure cable with a built-in or separate cable clamp. Strip 6″–8″ of outer sheathing, then strip 3/4″ of insulation from black and white wires. Connect black to black (hot), white to white (neutral), and bare copper to the housing ground screw using wire nuts. Tuck wires into the housing junction box.
-
Secure the fixture. Push the housing into the ceiling opening. Squeeze and rotate the spring clips until they rest flat on the ceiling surface above the drywall. The housing rim should sit flush with the ceiling.
-
Attach brass trim. Most remodel housings use coil springs or torsion springs to hold trim rings. Insert the springs into the trim’s retention holes, then compress and hook them into the housing slots. The brass trim should sit snug against the ceiling with no gaps. Some canless LED fixtures use magnetic or twist-lock attachments, follow manufacturer instructions.
-
Install bulb (if applicable). Screw in the LED or compatible bulb. For dimmable LEDs, confirm the dimmer switch is LED-rated to avoid flicker.
-
Restore power and test. Flip the breaker, turn on the switch, and verify operation. Check that the brass trim sits evenly and that no light leaks around edges.
Permit and Code Notes
Most jurisdictions require electrical permits for new circuits or fixture additions. Inspections ensure wiring meets NEC standards, particularly for wire gauge, box fill, and AFCI/GFCI protection. If you’re adding lights to an existing circuit, confirm it has capacity, most 15-amp lighting circuits can handle 12–15 fixtures depending on wattage. When working near structural elements like joists, drilling or notching must comply with IRC guidelines to avoid compromising load-bearing capacity.
Maintaining and Cleaning Your Brass Recessed Lights
Brass requires more attention than powder-coated finishes, but upkeep is straightforward.
Dusting: Wipe trim rings monthly with a microfiber cloth. Dust and ceiling texture residue dull brass over time. For hard-to-reach fixtures, use an extendable duster.
Deep Cleaning: Every few months, dampen a soft cloth with warm water and a drop of dish soap. Wipe the brass trim, then dry immediately with a clean towel. Avoid abrasive pads or harsh chemicals, both can strip lacquer or scratch unlacquered brass.
Polishing Lacquered Brass: If the finish remains shiny, it’s likely lacquered. Use a brass polish formulated for lacquered finishes (read labels carefully). Apply sparingly with a soft cloth, buff gently, and remove residue.
Polishing Unlacquered Brass: Raw brass tarnishes naturally. To restore shine, use a commercial brass polish or a homemade paste of equal parts lemon juice, baking soda, and salt. Rub in small circles, rinse with water, and dry thoroughly. Some homeowners embrace the patina for a lived-in look: if that’s your preference, skip polishing entirely.
Bulb Replacement: Turn off power before changing bulbs. LED bulbs last 15,000–25,000 hours, reducing replacement frequency. When swapping bulbs, avoid touching brass trim with bare hands, oils accelerate tarnish. Use a cloth or wear cotton gloves.
Avoid Moisture Exposure: In damp-rated bathrooms, condensation can accelerate tarnish. Ensure exhaust fans run during and after showers to minimize humidity contact.
Design Tips for Incorporating Brass Recessed Lighting
Brass recessed lighting works across styles, but thoughtful integration prevents a disjointed look.
Match Other Metals, Or Don’t: The old “match all metals” rule has relaxed. Brass pairs well with matte black, brushed nickel, and even chrome in the same room, as long as one finish dominates. If brass appears in lighting, consider echoing it in cabinet pulls, plumbing fixtures, or lighting elsewhere.
Balance Warm and Cool Tones: Brass reads warm. Pair it with warm white or soft white LEDs (2700K–3000K) for cohesion. Cool white (4000K+) creates a jarring contrast unless the design specifically calls for it.
Use Brass as an Accent, Not the Star: In most rooms, brass recessed lights should support the design, not dominate it. Pair them with understated millwork, neutral walls, or natural materials like wood and stone. In maximalist or eclectic interiors, brass can take a bolder role alongside patterned tile, colorful cabinetry, or statement wallpaper.
Layer Lighting Thoughtfully: Recessed fixtures provide general or task lighting. Add pendant lights, sconces, or under-cabinet LEDs for depth. Brass pendants or sconces with matching recessed trims create visual continuity.
Consider Patina Over Time: If you’re installing unlacquered brass, understand it will darken and develop character. This works beautifully in traditional, farmhouse, or vintage-inspired interiors but may feel out of place in ultra-modern spaces. Lacquered or PVD finishes stay bright indefinitely.
Test Before Committing: Brass varies widely, from rose gold tones to deep antique finishes. Order samples or buy one trim to test against your existing finishes and lighting conditions before ordering a full set. Many DIY projects benefit from this trial-and-error approach, and lighting is no exception.
Spacing and Layout: Even beautiful fixtures look awkward if poorly spaced. Use a consistent grid or align fixtures with architectural features (beams, cabinetry edges). Avoid centering fixtures over furniture that may move.
Conclusion
Brass recessed lighting bridges function and design, offering warmth and character in spaces that might otherwise rely on generic white trims. With proper planning, installation, and maintenance, brass fixtures elevate a room’s finish level without requiring ongoing fuss. Whether retrofitting a single room or wiring new construction, the key is treating brass as part of a cohesive lighting and design strategy, not just swapping one trim color for another. Done well, brass recessed lighting feels timeless rather than trendy.


