
A dark kitchen isn’t just inconvenient, it’s a safety hazard. Chopping vegetables in dim light increases the risk of accidents, and inadequate illumination makes cooking more difficult than it needs to be. Whether you’re remodeling or just upgrading tired fixtures, getting bright kitchen lighting right transforms how the space functions and feels. This guide walks through fixture types, brightness levels, bulb specs, and practical installation steps to help you create a well-lit kitchen without paying a contractor.
Table of Contents
ToggleKey Takeaways
- Bright kitchen lighting improves safety during food prep and reduces eye strain, with recommended levels of 50–100 foot-candles for task areas and 30–40 for ambient lighting.
- A layered lighting approach combining ambient fixtures (recessed downlights or flush mounts), task lighting (under-cabinet LEDs), and dimmer switches creates functional and flexible bright kitchen lighting.
- LED bulbs with 4000K–5000K color temperature and CRI 90+ deliver the brightness and color accuracy kitchens demand, providing 15,000–50,000 hours of lifespan with minimal heat.
- Calculate total lumens needed by multiplying room square footage by 50–75, then divide by fixture count; a 120-square-foot kitchen requires roughly 9,000 lumens across fixtures.
- DIY installation of under-cabinet strips and recessed lights is manageable for accessible ceilings, but hiring a licensed electrician ensures safe wiring and local code compliance for complex layouts.
- Well-lit kitchens enhance resale value and create an inviting social space, making investment in proper illumination worthwhile for both function and aesthetics.
Why Bright Lighting Matters in Your Kitchen
The kitchen demands more light than nearly any other room in the house. Food prep involves sharp knives, hot surfaces, and precision work, all tasks that become dangerous in poor lighting.
Proper illumination reduces eye strain during extended cooking sessions and helps with color accuracy when evaluating food doneness. Underlit kitchens also feel smaller and less inviting, which matters when the kitchen doubles as a social hub.
From a safety standpoint, adequate lighting prevents trips, burns, and cuts. The IRC (International Residential Code) doesn’t mandate specific brightness levels for residential kitchens, but the general recommendation is 50–100 foot-candles for task areas and 30–40 foot-candles for general ambient lighting. That’s significantly brighter than living rooms or bedrooms.
Beyond function, bright lighting affects resale value. Prospective buyers notice dark, dated kitchens immediately, and a well-lit space photographs better for listings.
Types of Bright Kitchen Lighting to Consider
Ambient Lighting Solutions
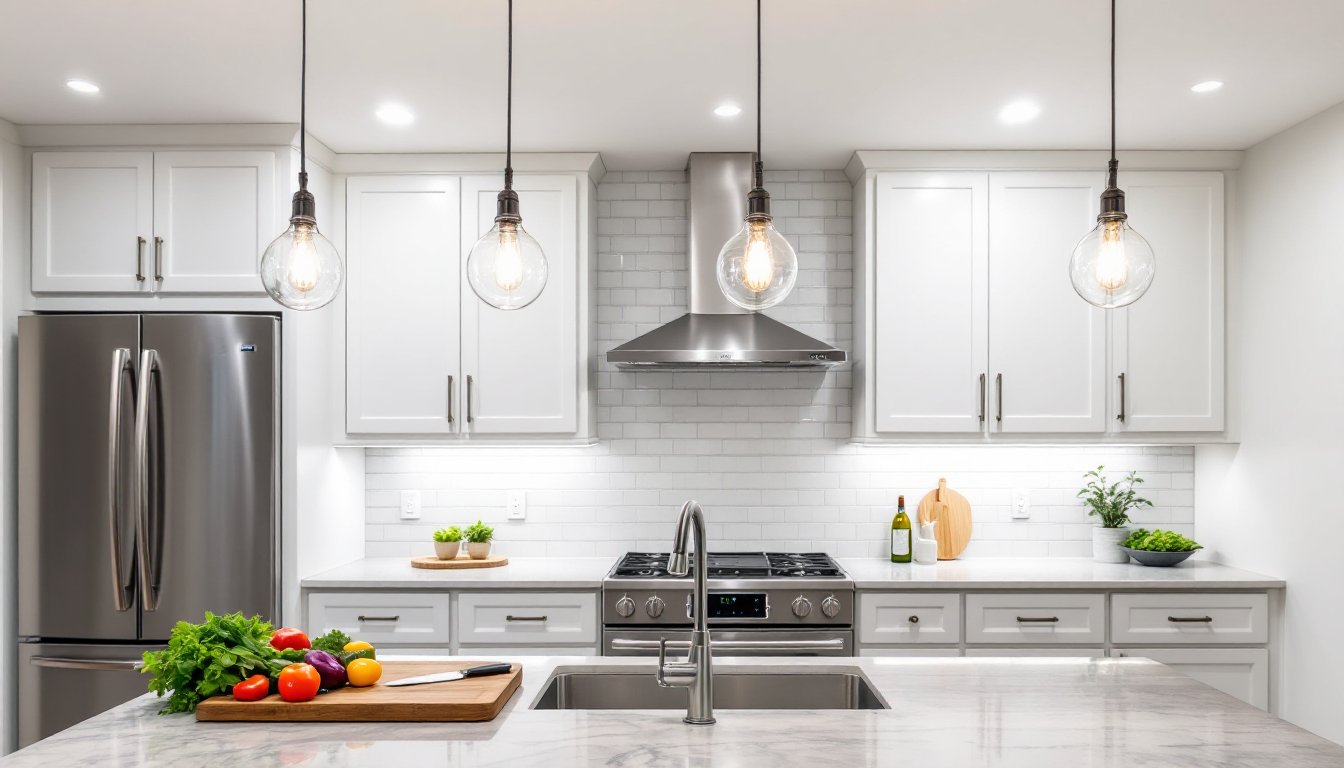
Ambient lighting provides overall illumination and sets the baseline brightness for the entire kitchen. Recessed downlights (also called can lights) are the workhorse here, installed in the ceiling grid, typically spaced 4–6 feet apart depending on ceiling height and fixture output.
For standard 8-foot ceilings, use 4-inch or 6-inch recessed housings with LED retrofits rated at 650–1000 lumens per fixture. Higher ceilings need more powerful fixtures or closer spacing to achieve the same foot-candle levels at counter height.
Flush-mount or semi-flush ceiling fixtures work well in kitchens with low ceilings or where recessed lights aren’t practical (like in older homes with plaster ceilings and no attic access). Look for fixtures with diffusers that spread light evenly rather than creating harsh hotspots.
If the kitchen has an island or peninsula, a pendant light cluster can supplement ambient lighting while adding visual interest. Choose pendants with translucent or open-bottom shades that direct light downward, solid metal shades look stylish but reduce overall room brightness. Many homeowners combine ambient lighting with track light heads for adjustable coverage in kitchens with evolving layouts.
Task Lighting for Food Prep Areas
Task lighting targets specific work zones: countertops, sinks, ranges, and cutting boards. The standard approach is under-cabinet LED strip lights or puck lights, mounted to the underside of wall cabinets to illuminate the countertop below.
LED strips are easier to install than puck lights and provide seamless, shadow-free coverage. Use high-CRI (Color Rendering Index) LEDs rated 90 or above so food colors appear accurate, important when checking meat doneness or evaluating produce ripeness.
For kitchens without upper cabinets (open shelving or all-base layouts), pendant task lights hung 30–36 inches above the counter provide focused light. Adjustable-arm wall sconces also work, especially flanking a range or sink.
Over the sink, a dedicated task light, either a recessed fixture directly above or a pendant, prevents shadows when washing dishes or prepping vegetables. If the main overhead ambient lighting is centered in the room, the sink often ends up in a dim corner without supplemental task lighting.
How to Choose the Right Brightness Level
Brightness is measured in lumens (total light output) or foot-candles (lumens per square foot at a surface). Most DIYers find lumens easier to work with when selecting bulbs and fixtures.
For a 100-square-foot kitchen, target 5,000–7,500 lumens total for general ambient lighting. That breaks down to roughly 50–75 lumens per square foot. Larger kitchens (150–200 square feet) need proportionally more, 7,500–15,000 lumens depending on ceiling height and layout.
Task lighting adds another layer. Under-cabinet lighting should deliver 300–500 lumens per linear foot of counter to properly illuminate work surfaces. A 4-foot run of counter needs 1,200–2,000 lumens from the under-cabinet fixtures.
Calculating lumens is straightforward: multiply room square footage by 50 (minimum) or 75 (bright), then divide by the number of fixtures to determine lumens per fixture. For example, a 120-square-foot kitchen shooting for 75 lumens/sq ft needs 9,000 lumens total. With six recessed fixtures, that’s 1,500 lumens each.
Dimmer switches are essential. Even if you want bright light for cooking, you’ll appreciate the ability to dial it down for mood lighting during dinner or late-night snacking. Make sure to use dimmers rated for LED loads, old incandescent dimmers cause LED flicker and hum. When layering task and ambient lighting, the approach mirrors principles used in restaurant lighting to balance function with atmosphere.
Best Bulb Types for Maximum Kitchen Brightness
LED bulbs dominate kitchen lighting in 2026 for good reason: high lumens per watt, long lifespan (15,000–50,000 hours), and minimal heat output. A 14-watt LED produces the same brightness as a 100-watt incandescent while generating a fraction of the heat, critical when fixtures are enclosed or grouped tightly.
For color temperature, 4000K–5000K (neutral to cool white) delivers the crisp, bright feel most homeowners want in kitchens. Warmer temps (2700K–3000K) can feel too yellow and dim, though some prefer them for evening ambiance. Avoid mixing color temps in the same room, it creates a disjointed, unfinished look.
CRI (Color Rendering Index) matters more in kitchens than anywhere else in the house. Stick with CRI 90+ so tomatoes look red, not orange, and raw chicken doesn’t appear gray. Cheap LEDs often sit at CRI 80, which distorts colors noticeably.
For recessed fixtures, integrated LED downlights are cleaner and easier than screw-in bulbs. The LED module is built into the housing, and most units retrofit into existing recessed cans without rewiring. They’re rated by lumens and beam angle, narrow floods (40–60°) for task lighting, wide floods (90–120°) for ambient coverage.
Smart LEDs with app control or voice integration have become mainstream, and some homeowners prefer Bluetooth lighting for hands-free dimming. Just confirm they hit the brightness and CRI specs you need, some smart bulbs sacrifice output for connectivity features.
Installation Tips for DIY Bright Kitchen Lighting
Before starting any electrical work, shut off power at the breaker and verify it’s off with a non-contact voltage tester. Kitchen circuits often share breakers with other rooms, so test each fixture location individually. Wear safety glasses and gloves when cutting drywall or handling sharp fixture edges.
For recessed lighting in accessible ceilings (attic above or unfinished basement below), installation is manageable for most DIYers. Mark fixture locations, cut holes with a hole saw (typically 4¼” or 6¼” depending on housing size), and fish 14/2 NM cable between fixtures. Most modern recessed housings are “remodel” style with spring clips that grip the drywall, no need to attach to joists.
IC-rated (insulation contact) housings are required if insulation touches the fixture. Airtight IC-rated models prevent conditioned air from escaping into the attic, which matters for energy efficiency and code compliance in newer builds or remodels. According to guidance on proper kitchen lighting from Bob Vila, proper layering techniques ensure adequate brightness without harsh shadows.
Under-cabinet lighting is simpler. Hardwired LED strips require a hole drilled through the cabinet back or bottom to route power cable, then surface-mount clips to secure the strip. Plug-in LED strips are even easier but require an outlet inside the cabinet or nearby. Use a low-voltage DC power supply tucked into an upper cabinet to keep wiring tidy.
For pendant lights over an island, the biggest challenge is centering the junction box. If the existing box isn’t positioned right, you’ll need to install a new one, either by cutting drywall and mounting a new-work box to a joist, or using a remodel ceiling fan box rated for fixture weight if you can’t access the joist.
Wire connections follow standard practice: black to black (hot), white to white (neutral), bare copper to ground. Use wire nuts sized for the number and gauge of conductors, don’t overstuff connections. Tuck wires neatly into the junction box before securing the fixture canopy.
NEC (National Electrical Code) 2023 requires kitchen countertop receptacles to be GFCI-protected and within 2 feet of each counter section, relevant if you’re adding outlets alongside new lighting. Check local codes before starting: some jurisdictions require permits for new circuit runs or fixture additions, especially if you’re adding recessed lights to a previously unlit area. For design inspiration on balancing function with aesthetics, resources like Remodelista showcase real-world kitchen remodels.
Dimmer installation is straightforward: remove the old switch, connect the dimmer’s leads to the circuit wires (again, black to black, white to white, ground to ground), and secure it in the box. LED-compatible dimmers are essential, look for packaging that specifies “LED/CFL” compatibility. Some dimmers require a neutral wire: if your switch box only has hot and switch-leg wires, you’ll need a two-wire dimmer model.
Finally, test everything before buttoning up walls or ceilings. Flip the breaker back on, check each fixture for proper operation, and confirm dimmers adjust smoothly without flicker. If you’re installing multiple zones (ambient, task, accent), consider labeling breakers and switches clearly so future troubleshooting is easier.
For kitchens with complex layouts or if you’re uncomfortable working with 120V circuits, hiring a licensed electrician is the safer call. Many pros will rough-in boxes and circuits while leaving finish fixture installation to the homeowner, a middle-ground approach that keeps costs down while ensuring safe wiring. The average cost for professional recessed lighting installation runs $200–$400 per fixture including materials and labor, though regional rates and project complexity swing that figure significantly. The Kitchn regularly features kitchen design ideas highlighting practical lighting layouts for various kitchen sizes.
After installation, keep fixture manuals and warranty info filed. LED integrated fixtures typically carry 5-year warranties, and knowing the model number simplifies replacement if a driver fails down the road.


