
Farmhouse outdoor lighting blends practical illumination with the clean lines and nostalgic appeal of rural design. Whether someone’s updating a century-old front porch or adding character to a new build, the right fixtures deliver curb appeal and functional light where it’s needed most, entryways, pathways, garages, and gathering spaces. The farmhouse look has staying power because it’s versatile, working equally well on traditional clapboard siding or modern board-and-batten exteriors. In 2026, these fixtures remain a top choice for homeowners who want warmth, durability, and a style that doesn’t feel trendy or dated after a season.
Table of Contents
ToggleKey Takeaways
- Farmhouse outdoor lighting combines utilitarian design with durable materials like galvanized steel, matte black powder coat, and oil-rubbed bronze to deliver timeless curb appeal across any home style.
- Proper fixture sizing is critical—divide your door height by four to determine sconce dimensions, and mount entryway lights at 60-66 inches for balanced proportions.
- Barn lights and gooseneck sconces excel for task lighting over garage doors and utility areas, with shade diameters ranging from 10-18 inches depending on wall height and architecture.
- Entryways require 800-1200 lumens for visibility, while pathway lighting can use 400-600 lumens; choose replaceable bulbs over integrated LEDs to accommodate future technology upgrades.
- Weatherproof installation is non-negotiable for outdoor fixtures—use marine-grade hardware in coastal areas, seal all entry points with exterior-grade caulk, and always verify fixtures are rated for wet or damp locations per UL standards.
- Before starting any electrical work, turn off power at the breaker and confirm the circuit is dead with a non-contact voltage tester; check local building codes, as many jurisdictions require permits for new exterior lighting installations.
What Defines Farmhouse Style Outdoor Lighting?
Farmhouse outdoor lighting pulls from the utilitarian fixtures once found on barns, industrial buildings, and rural porches. The style emphasizes straightforward shapes, think exposed bulbs, metal shades, cage guards, and weathered finishes. Materials lean toward galvanized steel, matte black powder coat, oil-rubbed bronze, or aged copper. Glass elements are usually clear seeded or frosted, not ornate beveled cuts.
Authentic farmhouse fixtures avoid excessive decoration. They’re built to last through weather cycles, with corrosion-resistant finishes and sealed electrical housings rated for wet or damp locations (check UL listings). Look for fixtures with corrosion-resistant hardware, stainless steel screws and sealed gaskets, especially in coastal or high-humidity climates. Bulb choices matter: Edison-style filament LEDs or warm-toned (2700K-3000K) bulbs reinforce the vintage vibe without the inefficiency of incandescent lamps.
The aesthetic pairs well with wood siding, stone veneer, and metal roofing. It’s a forgiving style that works on mid-century ranches, Craftsman bungalows, and newer builds designed to evoke rural simplicity. Just avoid over-accessorizing, farmhouse is about restraint, not layering every rustic element onto one façade.
Best Types of Farmhouse Outdoor Lighting for Every Space
Porch and Entryway Fixtures
Entryway lighting needs to balance visibility with scale. Flush-mount or semi-flush ceiling fixtures work on covered porches with limited overhead clearance, look for models 10-14 inches in diameter for standard 8-foot ceilings. For taller or more generous porches, pendant lanterns suspended 7-8 feet above the deck floor provide better light distribution without head-bumping risk.
Wall-mounted carriage lanterns or lantern sconces flanking the front door are a classic choice, especially on homes with vertical siding or brick. Mount them at eye level (60-66 inches to the center of the fixture) for balanced proportions. If the door is oversized or the entry is particularly grand, go larger, fixtures should feel substantial, not undersized. Pair them with a dusk-to-dawn photocell or smart switch for hands-free operation.
Ceiling fans with integrated light kits suit deeper porches where airflow and illumination are both priorities. Choose models with metal blades or wood-look composites in weathered oak or barn wood finishes. Many homeowners embrace the porch as an extension of living space, and Southern Living showcases creative ways to layer lighting and seating for year-round comfort.
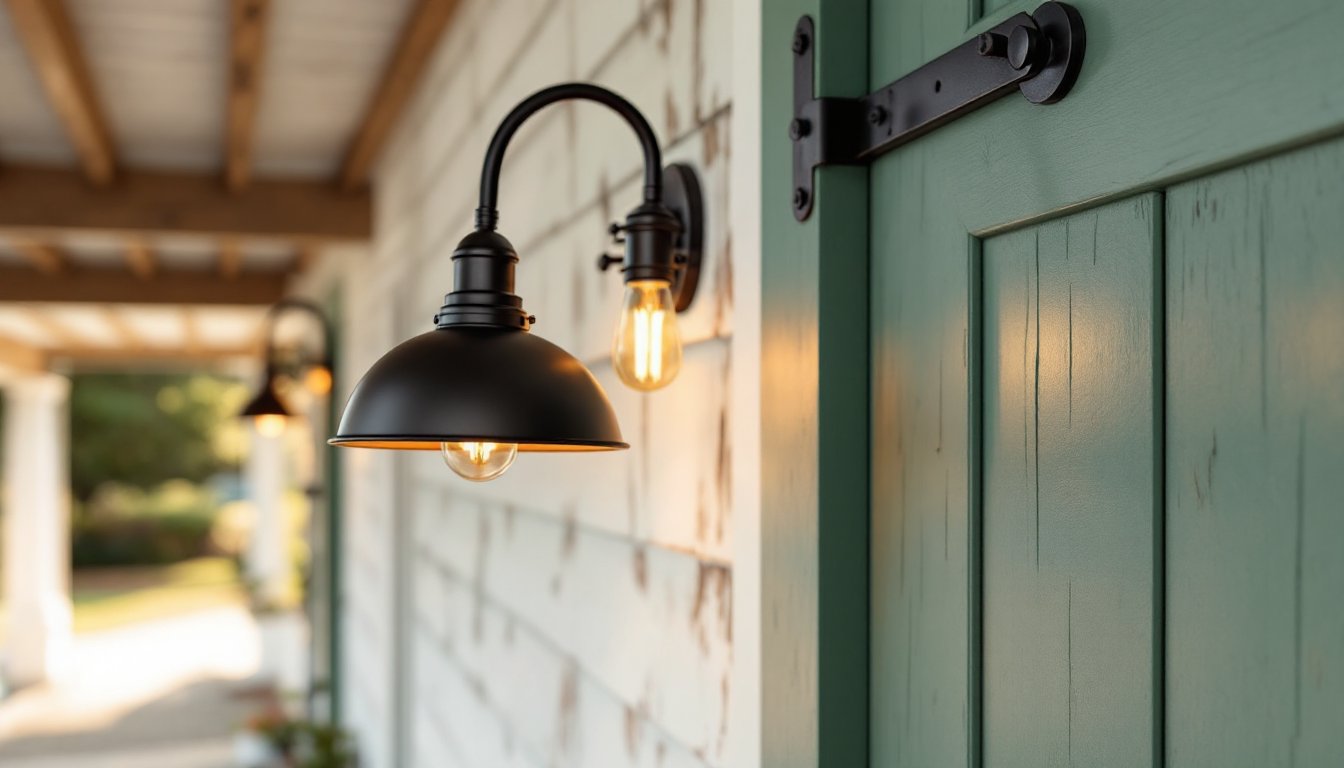
Barn Lights and Gooseneck Sconces
Barn lights, also called gooseneck sconces or warehouse shades, are the cornerstone of farmhouse exterior lighting. They originated in agricultural and industrial settings where durable, weather-resistant fixtures were non-negotiable. The design features a domed or angled metal shade with a curved arm that extends outward and down, casting focused light while shielding the bulb from the elements.
These fixtures excel at task lighting: over garage doors, workshop entries, mudroom doors, and outdoor sinks. Standard shade diameters range from 10 to 18 inches: larger shades suit double garage doors or tall walls, while smaller profiles fit tighter spaces. Mounting height depends on the application, 8-10 feet above ground level is typical for garage and utility doors.
Color and finish options are broad. Matte black and galvanized finishes are the most popular, but aged copper, forest green, and barn red add regional character without sacrificing the utilitarian look. Look for cast aluminum or heavy-gauge steel construction: thin stamped metal dents easily and won’t hold up to hail or wind-driven debris.
Gooseneck sconces also work well as accent lighting along covered walkways, breezeway entries, and detached studios. Pair them with weatherproof junction boxes and ensure the arm length provides adequate standoff from the wall, typically 12-18 inches, so the shade clears siding and trim. If the application is exposed to direct rain, verify the fixture is rated for wet locations, not just damp.
How to Choose the Right Farmhouse Outdoor Lights
Start with scale and proportion. A common mistake is choosing fixtures that are too small for the architecture. For front door sconces, measure the door height and divide by four, that’s a rough guideline for fixture height. On a standard 80-inch door, aim for sconces around 20 inches tall. Wider homes with extended eaves can handle larger pendants and broader barn shades.
Consider light output and beam spread. Entryways benefit from 800-1200 lumens per fixture to ensure visibility for keys, packages, and guest arrivals. Pathway and accent lighting can drop to 400-600 lumens. Choose fixtures with adjustable or replaceable bulbs rather than integrated LEDs, technology improves, and replaceable components extend fixture lifespan.
Finish durability matters more outdoors than inside. Powder-coated steel resists rust better than painted finishes: anodized or lacquered metals show wear faster in UV exposure. If the home is near saltwater, prioritize marine-grade or powder-coated stainless steel components. Coastal environments accelerate corrosion on standard hardware.
Match the fixture mounting method to the wall structure. Most outdoor lights attach to a standard 4-inch round or octagonal junction box, but heavier barn lights and large pendants may require a fan-rated or heavy-duty box secured to solid framing. If mounting to vinyl or fiber cement siding, use a weatherproof mounting block to create a sealed transition and prevent water infiltration behind the siding.
Smart controls and dimmers are increasingly practical. Many LED-compatible dimmers handle outdoor circuits without flicker, and smart switches or photocell timers reduce energy waste. Just confirm compatibility with the bulb type, some filament-style LEDs don’t dim smoothly on all dimmers. Country Living often highlights how thoughtful lighting choices elevate both function and farmhouse aesthetics across various outdoor spaces.
Installation Tips for DIY Farmhouse Outdoor Lighting Projects
Turn off power at the breaker, not just the switch, before starting any electrical work. Use a non-contact voltage tester to confirm the circuit is dead. Outdoor electrical work falls under National Electrical Code (NEC) Article 410 for luminaires, with local amendments, so check with the local building department if a permit is required, many jurisdictions require permits for new circuits or exterior fixture additions.
If replacing an existing fixture, the new one should mount to the same junction box. Inspect the box for rust, loose anchors, or cracked housing. If it’s compromised, replace it with a weatherproof electrical box rated for outdoor use, secured to a stud or blocking with appropriate fasteners. For new installations, run 14/2 or 12/2 NM-B cable (depending on circuit amperage) through walls or attic spaces, transitioning to UF-B cable if running underground. Use weatherproof wire nuts or push-in connectors rated for outdoor environments, and seal all entry points with silicone caulk or foam gaskets.
Mounting barn lights and gooseneck sconces often requires drilling into siding. Mark the mounting holes, drill pilot holes, and use stainless steel or coated exterior screws to prevent rust stains. If mounting to brick or stone, use a masonry bit and plastic or metal anchors rated for the fixture weight. Always place a bead of exterior-grade caulk around the backplate or mounting block before securing the fixture, this prevents water from wicking behind the siding.
For pendant fixtures, confirm the chain or downrod length allows proper clearance, 7 feet minimum above walking surfaces. Adjust the chain or rod before making final electrical connections: it’s easier to modify length before the fixture is live. Most pendants include a canopy that covers the junction box: ensure it seals tightly against the ceiling or soffit.
Wire connections should be straightforward: black (hot) to black, white (neutral) to white, and bare copper or green (ground) to the fixture ground and box ground. Use twist-on wire connectors sized for the wire gauge, and wrap connections with electrical tape for added protection. Tuck wires neatly into the box, don’t force or pinch them.
Once the fixture is mounted, install the bulbs and restore power at the breaker. Test the fixture with the switch, and check for flicker, buzzing, or dimming issues that could indicate a loose connection or incompatible bulb. If installing dimmers or smart switches, follow the manufacturer’s wiring diagram, some require a neutral wire, which older homes may not have at the switch box.
Ladder safety is critical. Use a fiberglass or wooden ladder for electrical work, metal ladders conduct electricity. Have a helper steady the ladder, especially on uneven ground, and never overreach. If working above one story or on steep slopes, consider hiring a licensed electrician. Gardenista frequently explores how exterior lighting integrates with landscape design, offering ideas on placement that complement plantings and hardscaping.
Safety gear: Wear safety glasses to protect against debris when drilling, and use work gloves when handling metal fixtures with sharp edges. If working in an attic or crawl space to route cable, wear a dust mask and use a headlamp for hands-free illumination.
Conclusion
Farmhouse outdoor lighting delivers timeless appeal and practical performance when chosen and installed with care. Focus on durable materials, proper sizing, and code-compliant installation. With the right fixtures and a little elbow grease, any exterior can gain the welcoming, lived-in character that defines the farmhouse aesthetic, without sacrificing modern efficiency or safety.


