
Good deck lighting isn’t just about aesthetics, it’s about making outdoor spaces safer and more functional after sunset. AZEK deck lighting offers a purpose-built solution for composite decking that integrates seamlessly with the material’s design while providing reliable illumination. Whether illuminating steps to prevent trips or creating ambient lighting for evening gatherings, AZEK’s lighting system combines weather resistance with straightforward installation. This guide covers everything from product options to installation techniques, helping homeowners make informed decisions about lighting their deck.
Table of Contents
ToggleKey Takeaways
- AZEK deck lighting is a low-voltage, 12-volt LED system designed to integrate seamlessly with composite decking, offering safety, durability, and energy efficiency for outdoor spaces.
- Proper transformer sizing and circuit planning are essential—add 20% overhead to your total fixture wattage to prevent overloading and extend transformer lifespan.
- Post cap lights define deck perimeters while riser lights enhance safety on stairs; space fixtures 6 feet apart for overlapping illumination and avoid dark gaps.
- DIY installation is simplified by quick-connect wiring harnesses, but always verify local electrical codes and test voltage for proper operation before finalizing connections.
- Layer multiple lighting types (perimeter, safety, and accent) with warm color temperatures (2700K–3000K) to create functional and inviting outdoor environments.
- Budget $200–300 for entry-level AZEK lighting kits or $800–1,500 for comprehensive systems; annual maintenance of connections, lenses, and transformers keeps systems reliable for 10+ years.
What Is AZEK Deck Lighting?
AZEK deck lighting is a low-voltage LED lighting system specifically designed to integrate with AZEK’s composite decking products, though many components work with other decking brands. The system operates on 12-volt power, making it safer to install than line-voltage lighting and reducing electrical hazards around moisture-prone outdoor areas.
The fixtures use LED bulbs rated for outdoor use, typically offering 30,000+ hours of life, roughly 10-15 years of normal use. This longevity reduces the need for bulb replacement in hard-to-reach locations like post caps or riser lights.
Most AZEK lighting products connect to a low-voltage transformer that steps down standard 120-volt household current. Transformers range from 45 watts to 200+ watts depending on how many fixtures the system supports. Proper transformer sizing matters: underestimate capacity and you’ll dim the lights or overload the circuit: oversize significantly and you waste money on unused capacity.
The fixtures themselves resist UV degradation and moisture intrusion, critical for components exposed to rain, snow, and temperature swings. Housing materials typically include composite, aluminum, or stainless steel hardware to prevent rust in coastal or humid climates.
Why Choose AZEK Lighting for Your Deck?
Integration stands out as the primary advantage. AZEK designs lighting components to match their decking color lines, Vintage, Harvest, and others, so post caps and trim rings blend rather than clash. This coordinated approach eliminates the guesswork of matching third-party products to specific deck shades.
Energy efficiency gives AZEK’s LED system an edge over older halogen or incandescent deck lights. A typical LED post cap draws 1-3 watts compared to 20+ watts for halogen equivalents. Over a season of nightly use, that difference adds up, especially on larger decks with a dozen or more fixtures.
Installation simplicity matters for DIYers. Many AZEK lights use quick-connect wiring harnesses instead of traditional wire nuts and electrical tape. This plug-and-play approach reduces the chance of loose connections that cause flickering or failure. Cable runs use low-voltage landscape wire, usually 12 or 14 AWG, which doesn’t require conduit in most jurisdictions, check local electrical codes, as requirements vary.
Durability in harsh weather separates quality systems from budget options. AZEK rates their fixtures for temperature extremes and impact resistance. Post caps, for instance, need to withstand hail, falling branches, and UV exposure without cracking or fading. Cheaper alternatives often fail within 2-3 years, while well-made LED systems last a decade or more.
Types of AZEK Deck Lighting Options
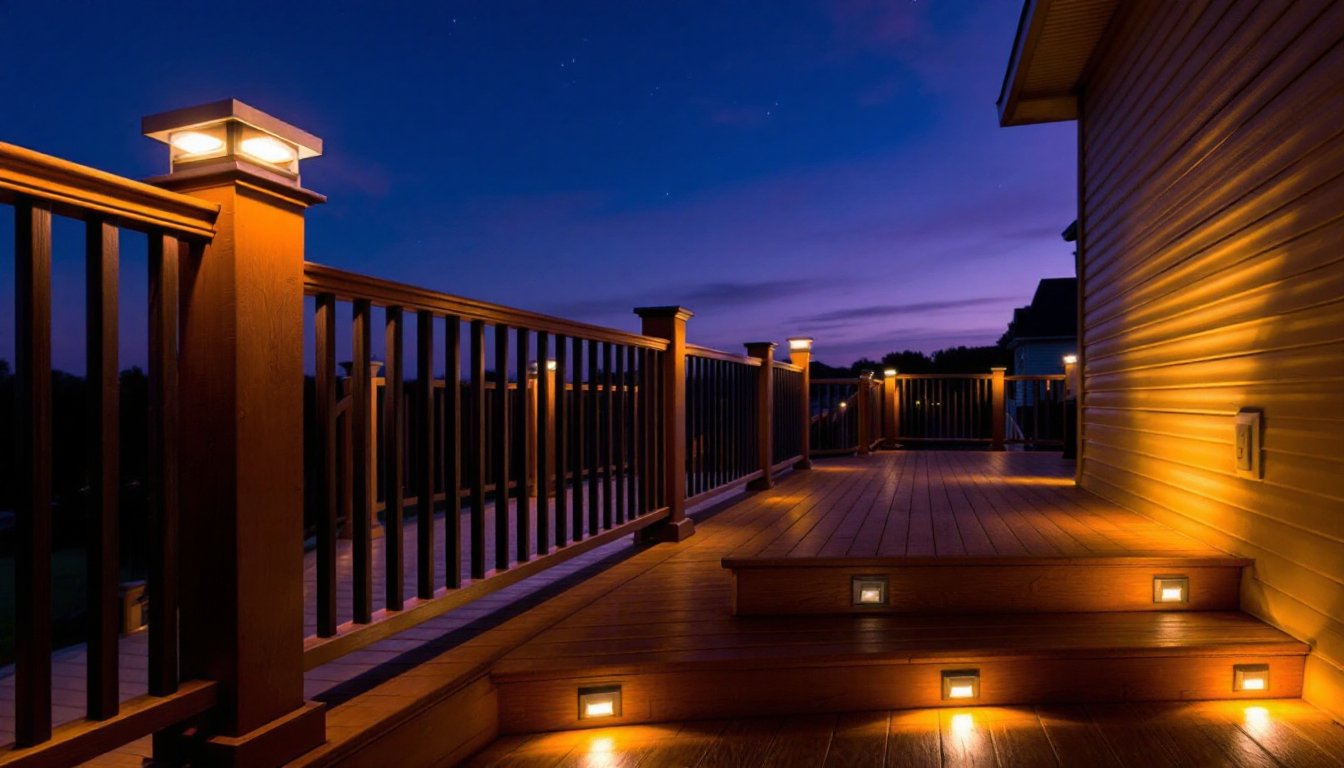
Post Cap Lights
Post cap lights mount directly onto deck posts, typically 4×4 nominal (actual 3.5″ x 3.5″) or 6×6 nominal sizes. They provide ambient lighting and visual markers for deck perimeters, helping guests navigate corners and edges in low light.
AZEK offers several styles:
- Low-profile caps sit flush with the post top, offering subtle downlighting without protruding skyward.
- Vintage-style lanterns add decorative elements with a more traditional appearance, suited to craftsman or farmhouse aesthetics.
- Contemporary cube designs feature clean lines for modern deck schemes.
Most post caps include a removable lens or diffuser for bulb access. Maintenance involves unscrewing the cap once every few years to check connections or replace an LED module if needed. Gaskets seal against moisture: inspect these annually and replace if cracked.
One design consideration: post caps illuminate downward in a cone pattern, typically covering a 4-6 foot radius at deck level. Space them accordingly, posts spaced 8 feet apart leave dark gaps, while 6-foot spacing provides overlapping light pools.
For inspiration on coordinating deck lighting with other home lighting upgrades, consider how fixture styles complement both indoor and outdoor spaces.
Riser and Step Lights
Riser lights mount on vertical stair faces, illuminating each tread edge to prevent missteps. Building codes in many jurisdictions don’t mandate deck stair lighting, but common sense does, poorly lit stairs account for a significant portion of deck-related injuries.
AZEK riser lights typically install in two ways:
- Surface-mount fixtures attach with screws to the riser face, sitting slightly proud of the surface. These work for retrofit applications where cutting into composite boards isn’t practical.
- Flush-mount lights require cutting a recess pocket, creating a cleaner look but demanding more careful installation. Use a hole saw sized to the fixture housing, drilling slowly to avoid melting composite material from friction heat.
Light output from riser fixtures tends to be subtle, 0.5 to 1.5 watts per fixture, just enough to define tread edges without creating glare. Position them centrally on each riser, roughly 4-6 inches above the tread.
Wiring multiple riser lights involves daisy-chaining fixtures along the stair run. Plan wire routing during deck construction if possible: retrofitting requires fishing cable under treads or alongside stringers. Secure low-voltage cable with plastic staples rated for outdoor use, keeping wire runs tight to framing to prevent snagging.
Smart home integration continues to grow in outdoor lighting, with many homeowners reading about smart home technology options before choosing systems with app control or voice activation.
How to Install AZEK Deck Lighting
Installation begins with planning the circuit. Map fixture locations, count total wattage, and size the transformer accordingly. Add 20% overhead to your wattage calculation to prevent running the transformer at max capacity, which shortens its lifespan.
Materials and tools needed:
- Low-voltage transformer (sized to total fixture wattage)
- 12 or 14 AWG low-voltage landscape cable
- AZEK lighting fixtures (post caps, riser lights, etc.)
- Wire strippers
- Screwdriver or drill with appropriate bits
- Voltage tester
- Outdoor-rated wire connectors or quick-connect harnesses
Step-by-step installation:
-
Mount the transformer near a GFCI-protected outdoor outlet. Transformers should be accessible but weatherproof: many mount directly to exterior walls. Follow manufacturer specs for ventilation clearance, heat buildup shortens transformer life.
-
Run main cable from the transformer to the deck area. Bury cable 6-8 inches deep if crossing lawn areas (check local codes for burial depth requirements). For above-ground runs, secure cable along joists or beams using staples every 18-24 inches.
-
Install post cap lights by removing existing post caps and routing wire down through the hollow post. Most composite posts have a hollow center: solid wood posts require drilling a channel. Connect fixture leads to the main cable using quick-connects or twist-on connectors wrapped with self-sealing silicone tape.
-
Mount riser lights by marking fixture locations, cutting recesses if using flush-mount style, and securing with stainless steel screws. Run cable along stair stringers, connecting each fixture in series.
-
Test the system before finalizing connections. Turn on the transformer and check that all fixtures illuminate evenly. Dim lights at the end of a cable run indicate voltage drop, either shorten the run, increase wire gauge, or split the circuit into two zones.
Safety notes: Always turn off power at the breaker before connecting the transformer. While 12-volt systems pose less shock risk than line voltage, moisture and electricity still don’t mix. Wear safety glasses when drilling composite material, as chips can fly. Use a dust mask if cutting multiple fixtures, composite dust is an irritant.
Permit requirements vary widely. Most jurisdictions don’t require permits for low-voltage landscape lighting, but always verify with local building departments. Some areas mandate licensed electrician work for any outdoor electrical connections, even low-voltage.
For those interested in outdoor projects that complement deck improvements, guides on hands-on DIY upgrades offer additional inspiration.
Design Ideas and Best Practices
Layer lighting for functionality and ambiance. Post caps define perimeters, riser lights handle safety, and under-rail strip lighting (if compatible with your system) adds accent illumination. Avoid over-lighting: too many fixtures create glare that actually reduces visibility by forcing pupils to constrict.
Color temperature affects mood. Most AZEK LEDs range from 2700K to 3000K (warm white), which feels inviting for residential spaces. Cooler temperatures (4000K+) suit commercial settings but feel harsh in backyard environments. Match color temperature across all fixtures, mixing warm and cool creates an uncoordinated look.
Zoning circuits adds control flexibility. Instead of one transformer powering everything, split fixtures into groups: perimeter lighting on one circuit, stair lighting on another. This allows turning off ambient lights while keeping safety lighting active, or vice versa. Timers or photocells automate operation, though manual switches offer more control.
Maintenance keeps systems running smoothly. Annually:
- Inspect wire connections for corrosion or moisture intrusion
- Clean fixture lenses with mild soap and water
- Check transformer ventilation openings for debris
- Test GFCI protection by pressing the test button
- Tighten any loose mounting screws
Voltage drop becomes an issue on longer runs. If cable extends beyond 100 feet, expect noticeable dimming at the far end. Solutions include upsizing to 10 AWG wire, installing a second transformer, or using a multi-tap transformer with voltage settings for different zones.
Visual inspiration helps refine design choices: photos of completed AZEK lighting installations show real-world applications across various deck styles.
Budget considerations: Entry-level AZEK lighting kits start around $200-300 for basic post caps and a small transformer. Comprehensive systems for larger decks run $800-1,500, depending on fixture count and features. DIY installation saves labor costs, expect professional installation quotes at $500-1,200 on top of materials, varying by region and complexity.
Winter prep matters in cold climates. LED lights handle freezing temperatures, but transformers benefit from weatherproof covers. Don’t leave systems unplugged all winter unless you disconnect and drain any fixtures that might trap water, frozen water expands and cracks housings.


