
Outdoor lighting can transform a yard from forgettable to magazine-worthy after sunset, but only if the system delivers on reliability and control. Volt landscape lighting has become a go-to choice for homeowners who want commercial-grade durability without hiring a landscape contractor for every bulb change. Unlike big-box kits that corrode after two seasons, Volt builds fixtures from solid brass and copper, engineered to handle weather extremes and voltage drops across long runs. Whether you’re highlighting a Japanese maple or making a walkway safer, understanding how Volt systems work, and how to install them yourself, saves money and gives you full control over your outdoor lighting design.
Table of Contents
ToggleKey Takeaways
- Volt landscape lighting uses solid brass and copper construction with proprietary LED modules to deliver commercial-grade durability that outlasts cheaper alternatives by over a decade.
- Low-voltage Volt systems (12V-15V) require no electrical permit in most jurisdictions, are safer for DIY installation, and allow direct-burial cable at 6 inches deep without conduit.
- Multi-tap transformers with 12V, 13V, 14V, and 15V outputs enable compensation for voltage drop across long wire runs, ensuring consistent light brightness from first to last fixture.
- Proper planning and zoning—dividing fixtures into separate cable runs—reduces installation time by half and prevents costly re-trenching when balancing safety, aesthetics, and power distribution.
- Annual maintenance of lens cleaning, connection inspection, and vegetation trimming keeps Volt systems running efficiently for 15+ years, with modular design allowing affordable component replacement over full fixture replacement.
What Is Volt Landscape Lighting and Why Choose It?
Volt is a U.S.-based manufacturer specializing in professional-grade low-voltage landscape lighting systems. They’ve built a reputation among landscape architects and electricians for fixtures that outlast cheaper alternatives by a decade or more.
The brand focuses on three things: all-metal construction (no plastic housings that crack in UV exposure), proprietary LED modules that produce consistent color temperatures, and modular designs that let homeowners upgrade components without replacing entire fixtures. A typical Volt path light uses a 12V or 15V LED drawing 2-4 watts, powered by a transformer plugged into a standard 120V outlet.
Why choose Volt over generic kits? Voltage consistency. Cheaper systems suffer from voltage drop, the last fixture on a run glows dimmer than the first. Volt’s transformers include multi-tap outputs (12V, 13V, 14V, 15V) that let you compensate for line loss on longer wire runs. Their fixtures also use sealed connectors and silicone-gasketed lens assemblies, which prevent moisture intrusion that kills LEDs prematurely.
You’ll pay more upfront, expect $80-$150 per fixture compared to $20-$40 for home-center options, but the lifespan and light quality justify the cost for homeowners serious about curb appeal and resale value.
Understanding Low Voltage vs. Line Voltage Systems
Landscape lighting runs on either low voltage (12V-15V) or line voltage (120V). Volt manufactures low-voltage systems exclusively, which matters for DIY installation and safety.
Low-voltage systems step down household current using a transformer. The advantages:
- No electrical permit required in most jurisdictions (always verify local codes).
- Safer to work with, 12V won’t deliver a dangerous shock if you nick a wire while digging.
- Easier wire burial: most codes allow direct-burial 12V cable at 6 inches deep without conduit.
- Dimmer-friendly: transformers with built-in photocells or timers simplify automation.
The tradeoff? Voltage drop over distance. Copper wire resists current flow, so a 100-foot run of 12-gauge wire loses roughly 2-3 volts by the end of the circuit. That’s why Volt fixtures are designed to operate across a 10.8V-15V range without visible dimming or color shift.
Line-voltage systems (120V) eliminate voltage drop concerns and work well for large properties or commercial installs, but they require conduit burial per NEC Article 300, GFCI protection, and often a licensed electrician. For residential DIY projects under 300 watts of total load, low voltage is the practical choice. Modern smart home systems increasingly favor low-voltage designs, making them compatible with lighting control systems that manage brightness and scheduling from a smartphone.
Key Components of a Volt Lighting System
Transformers, Fixtures, and Wiring Essentials
Every Volt system starts with three core components: transformer, fixtures, and cable. Understanding each piece prevents costly mistakes.
Transformers convert 120V to 12V or 15V. Volt offers models ranging from 100 watts to 900 watts. Size the transformer by adding fixture wattages and multiplying by 1.25 (a safety margin). For example, ten 4-watt fixtures (40W total) need at least a 50-watt transformer. Volt’s transformers include:
- Multi-tap outputs: adjust voltage to offset line loss.
- Built-in timers or photocells: automate on/off cycles.
- Stainless steel enclosures: weatherproof for outdoor mounting.
Mount transformers within 2 feet of a GFCI-protected outlet, ideally under an eave or in a garage to avoid direct rain exposure.
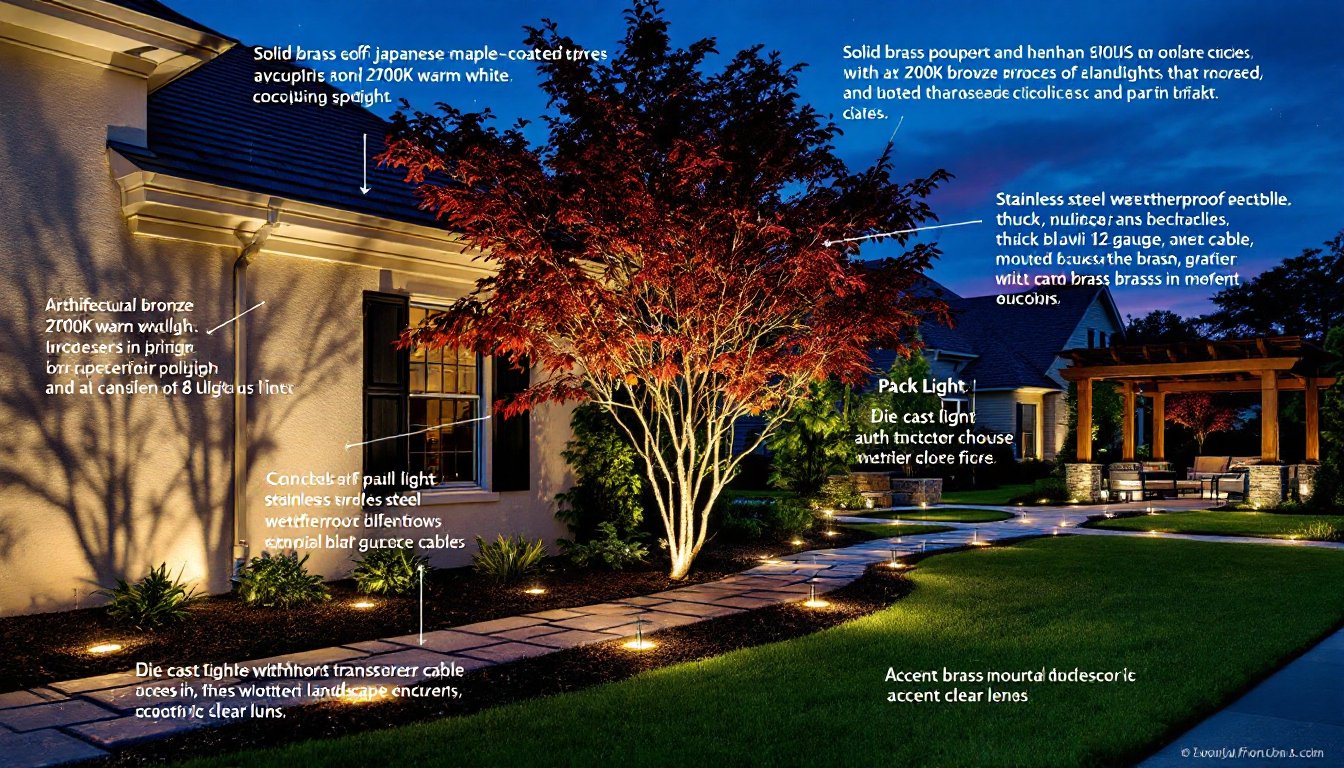
Fixtures come in categories: path lights, spotlights, well lights, hardscape lights, and area floods. Volt uses die-cast brass or copper bodies with powder-coated finishes (architectural bronze, natural copper, black). Key specs to check:
- Lumen output: 50-200 lumens for path lights, 300-600 for accent spotlights.
- Beam angle: narrow (10-20°) for uplighting trees, wide (60-120°) for walkways.
- Color temperature: 2700K-3000K (warm white) mimics incandescent: 4000K-5000K (cool white) suits modern architecture.
Wiring uses direct-burial cable, typically 12-gauge or 10-gauge stranded copper. Heavier gauge = less voltage drop. Volt recommends:
- 12-gauge wire for runs up to 100 feet with 100W load.
- 10-gauge wire for runs beyond 100 feet or loads above 150W.
Use grease-filled wire nuts or Volt’s proprietary hub connectors (twist-lock design with silicone seal) instead of standard wire nuts, which wick moisture and corrode. Never splice cable inside junction boxes buried in soil, all connections should happen at the transformer or inside fixture bases.
Planning Your Volt Landscape Lighting Layout
Good lighting design balances safety, aesthetics, and power distribution. Walk your property at dusk with a flashlight to identify priority areas: steps, grade changes, architectural features, and specimen plants.
Lighting zones:
- Pathways and steps: place fixtures every 6-10 feet on alternating sides. Overlapping pools of light eliminate dark gaps. Use 50-100 lumen path lights.
- Accent lighting: spotlight focal points like trees, statuary, or water features. Position fixtures 3-5 feet from the base of a tree, angled upward. For a 15-foot tree, a 3-watt LED spotlight (200 lumens) typically suffices.
- Hardscape lighting: illuminate retaining walls, pergolas, or deck railings with recessed step lights or surface-mount strips. Keep fixtures below eye level to avoid glare.
- Security/area lighting: floods near garage doors or side gates. Use fixtures with motion sensors or integrate them with home security systems.
Zoning for voltage consistency: divide fixtures into separate cable runs (zones) to prevent overloading and minimize voltage drop. A single 200-watt transformer can support two or three independent zones, each with its own cable run. This also allows different schedules, front walkway lights on all night, backyard accent lights off at 11 PM.
Sketch your layout on graph paper or use a landscape design app. Mark transformer location, measure cable runs, and count fixtures per zone. Add 10% extra cable length for routing around obstacles and future adjustments. According to reviews of top landscape lighting options, proper planning reduces installation time by half and prevents the need for re-trenching.
Step-by-Step Installation Guide for DIY Homeowners
Installing Volt landscape lighting doesn’t require an electrician’s license, but it does demand attention to detail. Budget a weekend for a typical 10-fixture system.
Tools and materials:
- Volt transformer (sized to total load)
- Fixtures with stakes or mounting hardware
- Direct-burial cable (12-gauge or 10-gauge)
- Wire strippers, grease-filled wire nuts or hub connectors
- Flat-blade spade or trenching shovel
- Safety glasses and work gloves
- Measuring tape, landscape paint for marking
Installation steps:
- Mount the transformer near a GFCI outlet, at least 12 inches above grade. Secure to wall with stainless screws.
- Lay out fixtures on the ground according to your plan. Adjust spacing while you can still move things, easier now than after trenching.
- Trench cable runs: use the spade to cut a narrow slit 6 inches deep. For hard soil, a flat-nose shovel or edger works better than a round-point spade. Keep trenches away from irrigation lines (call 811 for utility locates if unsure).
- Run cable through trenches, leaving 6-12 inches of slack at each fixture location. Don’t pull cable taut, temperature changes cause expansion/contraction.
- Connect fixtures: strip 1/2 inch of insulation, twist fixture leads to main cable using grease-filled connectors. Tuck connections inside fixture bases or use Volt’s hub system. Never leave exposed wire.
- Test the system before backfilling. Plug in transformer, verify all fixtures illuminate. Check for voltage at the last fixture (use a multimeter, should read 10.8V-15V). If below 10.5V, move some fixtures to a separate zone or upsize to 10-gauge wire.
- Backfill trenches and tamp soil. Stake fixtures vertically (use a level for path lights). Adjust aim for spotlights.
- Program the timer: set on/off times or use the photocell for automatic dusk-to-dawn operation.
Pro tip: Take photos of cable routes before backfilling. Six months later, when you’re digging a new planting bed, you’ll thank yourself. Many smart home platforms now integrate with timers and sensors, allowing homeowners to control outdoor lighting alongside indoor systems. According to testing from home tech experts, quality low-voltage systems pair well with Z-Wave or Wi-Fi-enabled controllers for whole-home automation.
Maintenance Tips and Troubleshooting Common Issues
Volt systems are low-maintenance, but annual checkups prevent small problems from becoming expensive repairs.
Routine maintenance (twice yearly):
- Clean lenses and reflectors with a soft cloth and mild detergent. Dirt and pollen reduce output by 20-30%.
- Check connections for corrosion. White or green oxidation on copper wire means moisture intrusion, re-strip and re-connect with fresh grease-filled nuts.
- Trim vegetation around fixtures. Overgrown shrubs block light and trap moisture.
- Inspect stakes and mounts: freeze-thaw cycles can heave fixtures out of alignment. Re-stake as needed.
Common issues and fixes:
- Fixture won’t light: Test voltage at the fixture base. If 12V+ is present, the LED module or connection is bad. Volt’s modular design lets you swap LED boards without replacing the entire housing.
- Flickering lights: loose connection or failing transformer. Check all wire nuts and hub connectors first. If connections are solid, the transformer’s internal capacitor may be wearing out (typical after 8-10 years).
- Dim lights at end of run: voltage drop. Solutions: shorten the cable run, upgrade to heavier gauge wire, or switch the transformer tap to 15V.
- Transformer hums or buzzes: normal for magnetic transformers under load. Electronic (solid-state) transformers run silent but cost 30-40% more.
- Photocell won’t turn lights on/off: debris or spider webs covering the sensor. Clean with a damp cloth. If it still malfunctions, replace the photocell unit (plug-in module, usually $15-25).
Winter prep: In freezing climates, disconnect and store fixtures that sit in planting beds subject to snow removal. Leave path lights and hardscape fixtures in place, they’re designed for year-round use. According to insights from smart home reviewers, integrating outdoor lighting with home automation platforms can extend component life by preventing over-run cycles and enabling remote diagnostics.
Warranty and replacement parts: Volt offers a 10-year fixture warranty and a 3-year transformer warranty. LED modules, lenses, and stakes are sold separately, making repair more economical than full replacement. Keep receipts and register products online for faster warranty claims.
Done right, a Volt landscape lighting system runs for 15+ years with minimal intervention. The upfront investment pays off in reliability, curb appeal, and the satisfaction of a professional-looking install you completed yourself.


