
Upgrading overhead lighting doesn’t mean ripping apart ceilings and rewiring from scratch. An 8 inch recessed lighting retrofit offers a practical path to modern, efficient illumination without the dust, mess, and expense of new construction. These kits install directly into existing housings or even outdated fixtures, making them ideal for remodels, rental upgrades, or simple refreshes. Whether replacing a yellowed dome light or converting old can lights to LED, an 8 inch retrofit delivers cleaner aesthetics and better light output in a weekend afternoon. This guide covers everything from choosing the right kit to avoiding common installation pitfalls.
Table of Contents
ToggleKey Takeaways
- An 8 inch recessed lighting retrofit installs directly into existing ceiling fixtures in 15 to 30 minutes without structural work, drywall patching, or new wiring, making it ideal for homeowners seeking efficient upgrades without renovation costs.
- LED retrofit kits consume 75% to 85% less energy than halogen alternatives, lasting 15 to 25 years and saving approximately $7 per fixture annually at current electricity rates, with payback in under 5 years compared to incandescent systems.
- Retrofit success depends on verifying ceiling opening size (7.5 to 8 inches), checking ceiling thickness, selecting appropriate lumens and color temperature for room function, and pairing dimmable kits with LED-compatible switches to avoid flickering.
- Always turn off power at the breaker and test circuits with a non-contact voltage tester before installation; common mistakes like using incompatible dimmers, ignoring junction box ratings, and skipping airtight seals can cause premature failure and energy waste.
- Material costs for 8 inch retrofit kits range from $18 to $80 depending on features, making them significantly cheaper and faster to install than new construction housings, which require 2 to 4 hours of labor per fixture plus potential permitting fees.
What Is an 8 Inch Recessed Lighting Retrofit?
An 8 inch recessed lighting retrofit is a conversion kit designed to update or replace an existing ceiling fixture without altering the ceiling structure or running new wiring. Unlike new construction cans that mount between joists before drywall goes up, retrofit kits work with finished ceilings.
Most 8 inch retrofit kits consist of a trim ring, an integrated LED module or lamp socket, and spring-loaded clips that grip the inside of an existing housing or ceiling hole. They’re engineered to fit standard 7-inch to 8-inch openings, making them compatible with older recessed cans, surface-mount fixtures, or junction boxes.
Retrofit kits come in two main formats: housing-based (which replace just the trim and lamp in an existing can) and canless designs (which mount directly to a junction box with no separate housing). Canless models have grown popular in recent years for their lower profile and simpler installation, but they require a properly rated junction box already in place.
Key components include the driver (integrated or remote), the LED array or socket, and the mounting mechanism. Higher-quality kits include dimmable drivers, adjustable color temperature settings, and airtight seals to prevent conditioned air from escaping into the attic.
Why Choose 8 Inch Retrofit Recessed Lights Over New Construction?
New construction cans require ceiling access from above and framing work that’s impractical in finished spaces. Retrofit kits eliminate that hassle.
Speed and simplicity rank first. A typical 8 inch retrofit installs in 15 to 30 minutes per fixture with basic hand tools, no attic crawling, no drywall patching, no dust storms. That’s a fraction of the time needed to cut joists, mount a housing, and fish wire.
Cost savings add up quickly. New construction housings run $15 to $40 each before adding trim and lamps. Retrofit kits bundle everything in one package, often for $20 to $60 total depending on features. Labor costs drop dramatically when a homeowner can handle the job without hiring an electrician for structural work.
Energy efficiency improves immediately when upgrading from old incandescent or halogen cans. Modern LED retrofit kits draw 12 to 20 watts while delivering 800 to 1,200 lumens, equivalent to a 75- to 100-watt incandescent. Many seasoned DIYers turn to home improvement advice resources when planning lighting upgrades to compare energy savings across fixture types.
Minimal disruption matters in occupied homes. Retrofit installations don’t require moving furniture, covering floors, or vacating rooms for days. The work happens from below, and cleanup involves sweeping up a handful of drywall dust at most.
Permitting requirements vary by jurisdiction, but most areas allow homeowners to replace existing fixtures on the same circuit without a permit, provided no new wiring or structural changes occur. Always verify local codes before starting.
Choosing the Right 8 Inch Retrofit Kit for Your Home
Not all 8 inch retrofit kits deliver the same performance or fit the same applications. Start by measuring the existing ceiling opening. Most 8 inch kits fit 7.5- to 8-inch holes, but verify the manufacturer’s spec sheet, some require as small as 6 inches, others need a full 8.25 inches.
Check the ceiling thickness. Standard kits handle 0.5-inch to 1-inch drywall, but thicker plaster or multi-layer ceilings may need extended mounting clips. Measure from the finished ceiling surface to the back of the housing or junction box if applicable.
Lumens and color temperature shape the room’s mood. Kitchens and workspaces benefit from 3,000 to 4,000K (bright white) at 1,000+ lumens per fixture. Living rooms and bedrooms feel more comfortable at 2,700 to 3,000K (warm white) and 700 to 900 lumens. Some kits offer selectable color temperature via a switch on the fixture, useful if room function changes over time.
Dimming compatibility requires matching the retrofit kit’s driver to the dimmer switch. Not all LED retrofits dim smoothly: look for kits labeled “0-10V dimmable” or “TRIAC dimmable” and pair them with LED-rated dimmers. Older incandescent dimmers cause flickering and premature failure.
Wet or damp ratings matter in bathrooms, covered porches, and basements. Look for UL-listed damp or wet location ratings if the fixture will encounter moisture. Standard dry-rated kits shouldn’t be used in these areas.
Airtightness becomes critical in climate-controlled homes. IC-rated (insulation contact) and AT-rated (airtight) kits prevent heat loss and air leakage, which can account for 2% to 5% of total HVAC costs if left unsealed.
LED vs. Halogen Options
LED retrofit kits dominate the market for good reason: they consume 75% to 85% less energy than halogen equivalents, last 15 to 25 years, and produce far less heat. A 15-watt LED retrofit delivers the same light output as a 65-watt halogen while generating minimal heat, critical for IC-rated installations where insulation contacts the fixture.
Halogen retrofits still appear in specialty applications. They offer excellent color rendering index (CRI) scores above 95, making them preferable in art studios or retail displays where color accuracy matters. But they burn hot, often exceeding 300°F, and burn out every 2,000 to 4,000 hours.
For most residential applications, LED wins on operating cost, longevity, and safety. Halogen makes sense only when color fidelity justifies the higher energy bill and frequent bulb changes.
Step-by-Step Installation Guide for 8 Inch Recessed Lighting Retrofits
Safety first: Turn off power at the breaker, not just the wall switch. Use a non-contact voltage tester to confirm the circuit is dead before touching any wires. Wear safety glasses to protect against falling debris.
Tools and materials:
- Non-contact voltage tester
- Screwdriver (flathead and Phillips)
- Wire strippers
- Wire nuts (if not included)
- Utility knife
- Stepladder
- Retrofit kit
- LED-rated dimmer (optional)
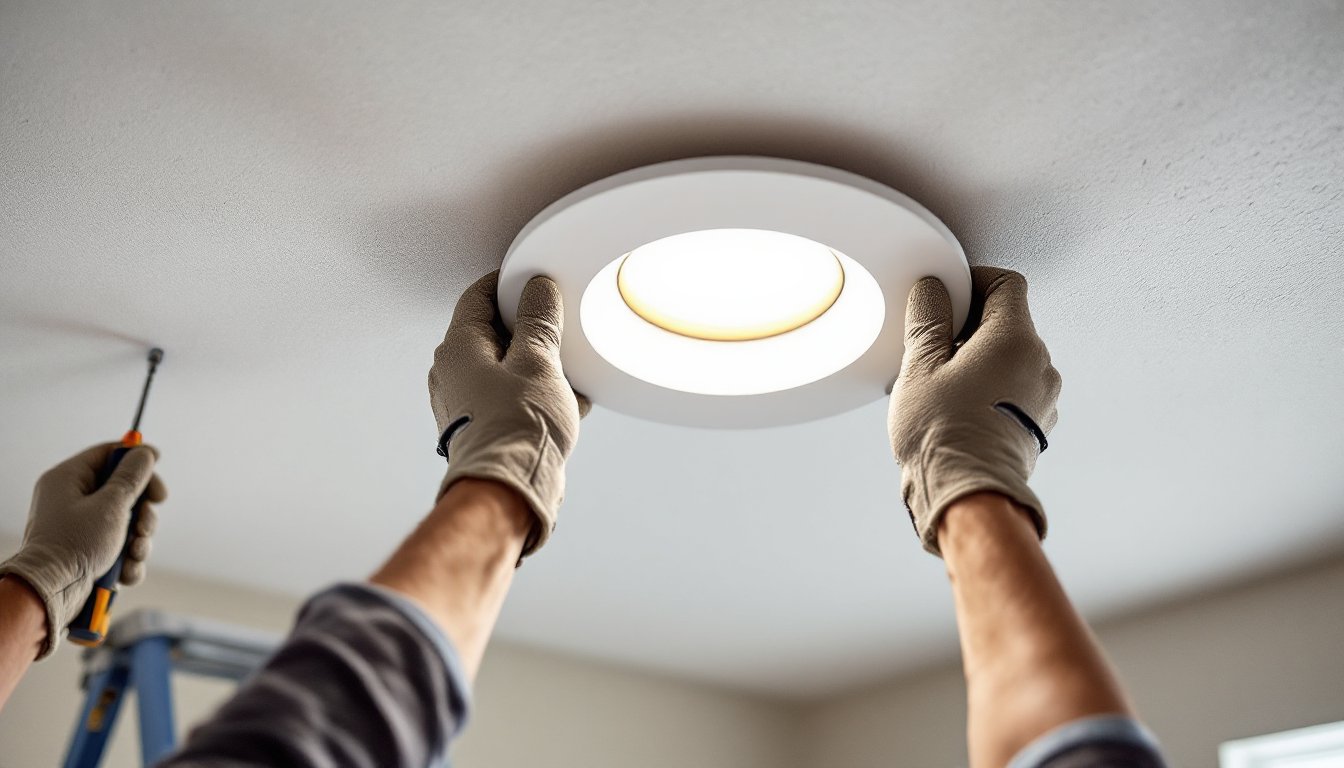
Step 1: Remove the old fixture. Unscrew or unclip the existing trim. If replacing a surface-mount dome light, remove the mounting screws and lower the fixture to expose the wiring. For existing recessed cans, pull out the old trim and bulb.
Step 2: Disconnect the wiring. Untwist the wire nuts connecting the fixture to the house wiring. You’ll typically find a black (hot), white (neutral), and bare or green (ground) wire. Straighten the wires and inspect for damage or corrosion.
Step 3: Prepare the retrofit kit. Most 8 inch LED retrofits come pre-wired with an integrated junction box or a pigtail connector. If installing a canless model, ensure the existing junction box is rated for fixture support and secured to a joist or blocking. Box-fill calculations under NEC Article 314 rarely become an issue with low-profile LED modules, but verify the box isn’t overstuffed.
Step 4: Connect the wiring. Match wire colors: black to black (hot), white to white (neutral), and ground to ground. Use twist-on wire connectors rated for the wire gauge (typically 14 AWG or 12 AWG). Tug each connection to confirm it’s secure. Some retrofit kits use quick-connect plugs instead of wire nuts, these snap together and require no stripping.
Step 5: Mount the fixture. For housing-based retrofits, push the module into the existing can until the spring clips engage. You’ll feel resistance, then a firm click. For canless kits, align the mounting bracket with the junction box screws and tighten until snug. Don’t overtighten, LED modules can crack under excessive torque.
Step 6: Attach the trim. Snap or screw the trim ring into place. Most modern kits use torsion springs that compress, insert, then expand to grip the ceiling. Others use threaded collars. Ensure the trim sits flush against the ceiling with no gaps.
Step 7: Restore power and test. Flip the breaker back on and test the fixture. Check dimming function if applicable. If the light flickers or doesn’t turn on, kill power and recheck all wire connections.
For detailed guidance on installing recessed lighting in various ceiling types, professional resources cover framing, fire-rating, and code compliance considerations.
Common Mistakes to Avoid During Retrofit Installation
Skipping the power test. Always verify the circuit is dead with a tester. Wall switches can be miswired, and multi-way switches can confuse even experienced DIYers.
Ignoring box ratings. Canless retrofit kits rely entirely on the existing junction box for support. A plastic old-work box not rated for fixture weight will sag or pull out of the drywall. Use a metal box or a fan-rated plastic box for anything over 10 pounds.
Forcing the trim. Retrofit clips should snap into place with moderate pressure. Excessive force bends clips or cracks the trim ring. If the trim doesn’t fit, confirm you’ve selected the correct kit for the hole size.
Mixing incompatible dimmers. LED retrofits paired with old incandescent dimmers cause buzzing, flickering, and shortened lifespan. Replace the dimmer switch with an LED-compatible model or run the fixture at full brightness only.
Covering IC-rated fixtures without verification. Just because a fixture is IC-rated doesn’t mean it should be buried under insulation without adequate clearance. Modern LED retrofits generate little heat, but older halogen models or improperly rated kits can overheat and fail prematurely. When in doubt, consult classic home restoration techniques for guidance on insulation clearance around recessed fixtures.
Neglecting airtightness. Unsealed retrofit installations leak conditioned air into attics, wasting energy and creating moisture problems. Use AT-rated kits or add a separate airtight trim gasket if upgrading older housings.
Overloading circuits. Adding multiple high-wattage fixtures to an existing circuit can trip breakers or overheat wiring. Calculate total load: a 15-amp circuit on 14 AWG wire supports up to 1,440 watts (80% of 1,800 watts per NEC guidelines). Most LED retrofits draw so little power this isn’t an issue, but confirm total fixture count before proceeding.
Cost Comparison: Retrofit vs. New Installation
Retrofit kit costs range from $18 for basic LED downlights to $80 for premium models with adjustable color temperature and high CRI. Mid-range kits with 1,000 lumens, 3,000K color temperature, and 90+ CRI typically run $30 to $50 each.
New construction installation involves multiple components: housings ($15 to $40), trim rings ($10 to $30), LED modules or bulbs ($8 to $25), plus wiring and junction boxes if not already in place. Total material cost per fixture: $40 to $100.
Labor shifts the balance dramatically. Retrofit installations take 15 to 30 minutes per fixture and rarely require professional help. New construction work involves cutting drywall, mounting housings between joists, fishing wire, patching, and painting, easily 2 to 4 hours per fixture for a DIYer, or $100 to $200 per fixture for a licensed electrician.
Permit and inspection fees vary by municipality but typically run $50 to $150 for new electrical work. Retrofit replacements on existing circuits usually don’t trigger permits, though adding circuits or relocating fixtures may.
Energy savings compound over time. A single LED retrofit drawing 15 watts instead of a 65-watt halogen saves 50 watts. At $0.13 per kWh (U.S. average as of 2026) and three hours of daily use, that’s roughly $7 per fixture per year. Over a 15-year LED lifespan, one retrofit saves $105 in electricity alone.
Break-even analysis for a typical six-fixture living room:
- Retrofit path: $240 materials, $0 labor, $50 energy savings/year = payback in under 5 years vs. old incandescent.
- New construction path: $480 materials + $800 labor = $1,280 total, payback extends beyond 20 years unless old fixtures were causing significant energy waste.
Retrofit makes financial sense unless the existing housings are damaged, improperly located, or incompatible with modern kits.


