
Mid century modern design isn’t confined to living rooms and dining spaces. The clean lines, geometric shapes, and warm glow of mid century outdoor lighting can completely transform a home’s curb appeal and usability after dark. Originally popularized in the 1950s and ’60s, these fixtures blend form and function in ways that still feel fresh today. Whether you’re restoring a period-correct ranch or adding character to a newer build, understanding the hallmarks of this style, and how to install it properly, makes all the difference between a lighting upgrade and a true exterior transformation.
Table of Contents
ToggleKey Takeaways
- Mid century outdoor lighting is defined by geometric simplicity, warm materials like brass and copper, and honest function—creating architectural elements that extend your home’s design language to the exterior.
- Choose warm-toned 2700-3000K LED bulbs to authentically capture the incandescent warmth of original mid century fixtures while enjoying modern energy efficiency.
- Wall sconces and porch lights are the workhorses of mid century outdoor lighting; select fixtures with solid brass or die-cast aluminum housings (not stamped steel) and adequate weather sealing for longevity.
- Scale matters: match fixture proportions to your home’s architecture—smaller sconces for modest ranches (10-12 inches) and larger pieces (16-18 inches) for homes with dramatic entry overhangs.
- Post lights should be spaced 15-20 feet apart, while low-voltage pathway lights work best at 8-10 foot intervals on alternating sides to create overlapping light pools without harsh shadows.
- Exterior electrical work requires permits in many jurisdictions; always turn off power at the breaker, use waterproof connections, and apply silicone caulk behind mounting plates to prevent water intrusion.
What Makes Mid Century Outdoor Lighting So Distinctive?
Mid century outdoor lighting stands out through a specific set of design principles rooted in postwar optimism and the materials revolution of the era. These aren’t decorative afterthoughts, they’re architectural elements that extend a home’s design language to the exterior.
Geometric simplicity defines the style. Look for spheres, cylinders, cones, and rectangular housings with minimal ornamentation. Fixtures often feature exposed bulbs or clean glass globes that showcase the light source rather than hiding it. The philosophy was honest materials and honest function.
Material palette typically includes brass, copper, aluminum, powder-coated steel, and opal glass. Finishes tend toward warm metals (aged brass, oil-rubbed bronze) or matte blacks and whites. Avoid anything with scrollwork, rustic patinas, or faux-antique treatments, those belong to other eras.
Proportions matter. Mid century fixtures use balanced, human-scale dimensions. A wall sconce might be 10-14 inches tall with a shallow profile, while a post light tops out around 6-7 feet. Oversized lanterns and bulky carriage lights miss the mark entirely.
Many designs from this era drew inspiration from Scandinavian and Japanese aesthetics, which is why you’ll see overlap with terms like “minimalist” or “modern” in product descriptions. The key differentiator is warmth, mid century pieces avoid the cold, clinical feel of some contemporary designs by incorporating wood accents, warm-toned metals, and softer light diffusion.
Best Types of Mid Century Outdoor Lighting for Your Home
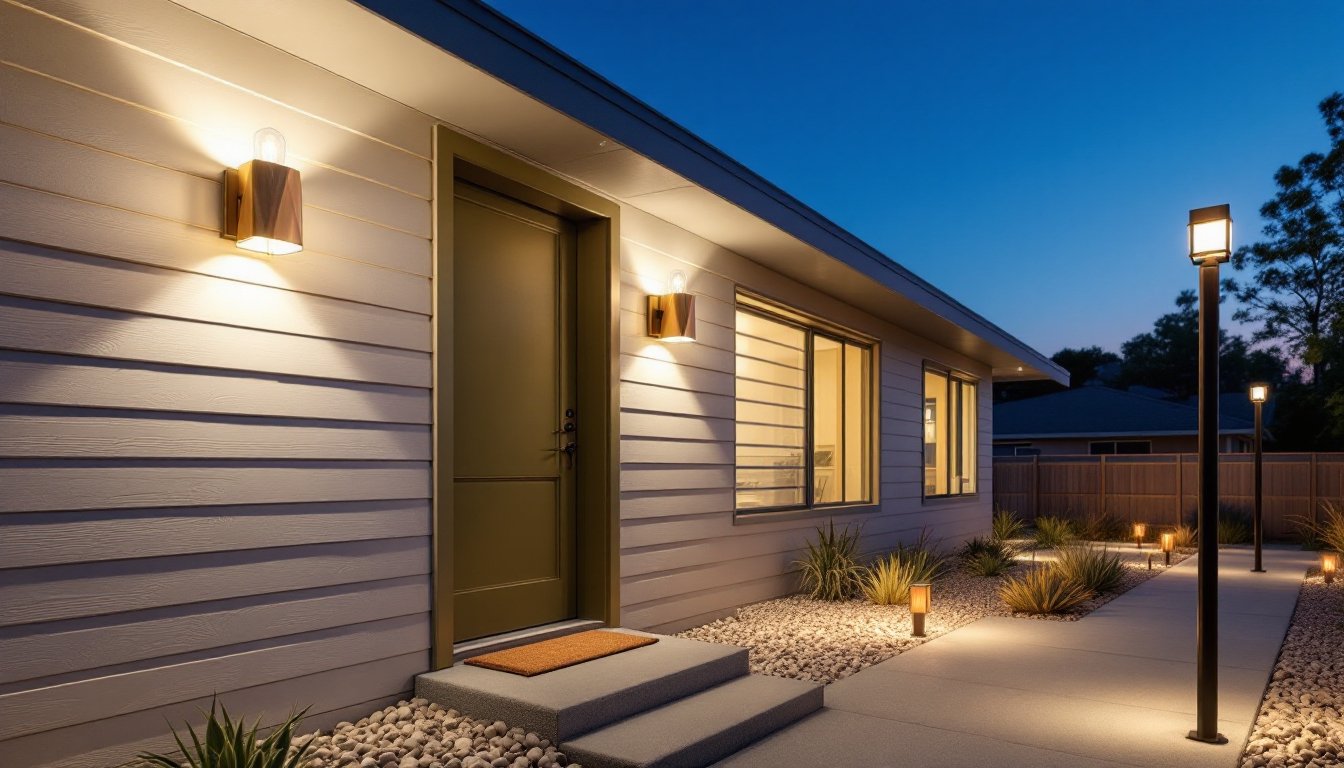
Wall Sconces and Porch Lights
Wall-mounted fixtures are the workhorses of mid century outdoor lighting, flanking entry doors, garage doors, and along covered patios. The most iconic styles include cone sconces (upward or downward facing), cylindrical fixtures with perforated metal housings, and simple globe sconces with exposed mounting hardware.
When selecting wall sconces, match the fixture depth to your wall material and mounting surface. Most mid century sconces have a 4-6 inch projection from the wall, which works well on standard wood or fiber cement siding. For brick or stucco, you’ll need tapcon screws or appropriate masonry anchors, more on that in the installation section.
Look for fixtures with die-cast aluminum or solid brass housings rather than stamped steel, which can warp or rust through powder coating over time. Quality pieces will have sealed gaskets where the glass meets the housing (typically rated IP44 or higher for weather resistance). The current design landscape offers contemporary furniture and lighting that bridges vintage authenticity with modern energy efficiency.
Porch ceiling lights in the mid century style tend toward semi-flush mount drums or simple pendant globes. A 10-12 inch diameter drum with an opal diffuser provides adequate illumination for a standard 6×8 foot entry porch while maintaining period-appropriate scale. If your porch ceiling is tongue-and-groove wood or exposed beam, surface-mount fixtures with visible hardware actually enhance the aesthetic.
Post and Pathway Lighting
Post lights anchor driveways, walkways, and property corners with vertical presence. Mid century versions favor slender posts (3-4 inch diameter) in black aluminum or wood-grain fiberglass, topped with geometric lamp heads. Heights typically range from 6 to 7 feet, tall enough to cast light effectively but not so high they feel commercial.
The lamp head itself might be a simple cube, a tapered lantern, or a sphere. Avoid anything resembling a gas lamp or coach light. For pathway definition, consider a series of three to five post lights spaced 15-20 feet apart, depending on lamp brightness and beam spread.
Low-voltage pathway lights offer a subtler approach. Modern LED versions with brass or copper stems and small cone shades echo mid century design without the formality of full post lights. These run on 12V systems, which means safer DIY installation and lower operating costs. A 100-watt transformer can power 8-12 pathway lights depending on wattage per fixture.
For pathways, the rule of thumb is one fixture every 8-10 feet on alternating sides of the walkway. This creates overlapping pools of light without harsh shadows. Bury low-voltage cable at least 6 inches deep (check local code, some jurisdictions require conduit even for low-voltage runs). Mark cable routes before backfilling to avoid future damage during landscaping.
How to Choose the Right Mid Century Fixtures for Your Space
Start by assessing your home’s architectural style and existing features. True mid century homes (built roughly 1945-1970) with low-pitched roofs, horizontal lines, and large windows can handle authentic reproduction fixtures or even restored vintage pieces. Newer homes benefit from mid century inspired designs that capture the aesthetic without looking like costume pieces.
Scale to your architecture. A modest ranch with a 3-foot-wide front door needs proportionally smaller sconces, think 10-12 inches tall. A home with a dramatic entry overhang and 8-foot double doors can handle 16-18 inch fixtures. When in doubt, make a cardboard template of the fixture dimensions and tape it to the wall. View it from the curb and your typical approach angle.
Light color temperature is critical and often overlooked. Mid century design pairs best with 2700-3000K bulbs (warm white), which mimic the incandescent bulbs originally used in these fixtures. Anything above 3500K starts to feel sterile and undercuts the warmth of the style. If you’re using LED retrofits or integrated LED fixtures, confirm the color temperature before buying, it’s usually listed in the product specs but not always prominent in marketing photos.
Lumens and coverage depend on fixture purpose. Entry door sconces should provide 600-800 lumens total (300-400 per fixture if using a pair) for adequate task lighting. Pathway and accent lighting can be much lower, 50-100 lumens per fixture. Many homeowners overlook the power of well-placed dim lights: multiple low-output fixtures create better visual interest than one bright floodlight.
Consider your home’s exterior color palette. Brass and copper fixtures develop a living patina that complements natural wood, brick, and stone. Black or matte white powder-coated fixtures work well with painted siding in earth tones, grays, or crisp whites. Resources like modern home design ideas showcase how material and finish choices impact overall aesthetic cohesion.
Existing wiring is a practical constraint. If you’re replacing old fixtures, you’re limited to locations with existing junction boxes (unless you’re prepared to run new wire, which often requires opening walls or soffits). Battery-powered or solar options exist but rarely deliver the light output or longevity needed for primary exterior lighting. Plan your design around electrical reality, not just visual preference.
Installation Tips for Mid Century Outdoor Lighting
Safety first: Turn off power at the breaker and verify it’s off with a non-contact voltage tester. Exterior electrical work falls under NEC (National Electrical Code) Article 110 and 410 for fixtures. Some jurisdictions require permits for new circuits or significant modifications, check with your local building department before starting.
Wall-mounted fixture installation begins with locating the existing junction box or installing a new one. Standard outdoor-rated boxes are made of PVC or die-cast aluminum. If you’re mounting to hollow vinyl siding, you’ll need to attach the box to a stud or install blocking between studs. Use a stud finder to locate framing, then cut an access hole.
For brick or stucco, use a hammer drill with a carbide masonry bit. Drill pilot holes, insert plastic anchors or tapcons, and mount a weather-rated box or fixture base plate. Apply a bead of silicone caulk behind the mounting plate to prevent water intrusion, this step is non-negotiable on any exterior installation.
Wire connections must be made with waterproof wire nuts or the push-in connectors supplied with quality fixtures (often pre-filled with dielectric grease). Match black to black (hot), white to white (neutral), and green or bare copper to ground. Tuck wires carefully into the box and secure the fixture base plate with corrosion-resistant screws. Many mid century fixtures use exposed mounting hardware, so make sure screws are straight and uniformly tightened.
Post light installation is more involved. You’ll need to run underground conduit from a power source to the post location. Most codes require schedule 40 or 80 PVC conduit for direct burial, with a minimum depth of 18 inches (or 12 inches if protected by GFCI). Dig the trench, lay conduit, pull THWN-2 wire (rated for wet locations), and backfill before setting the post.
Set the post in concrete for stability, a typical 4×4 post needs a hole 10-12 inches in diameter and 24 inches deep, below the frost line in cold climates. Plumb the post with a level and brace it in place while concrete cures (24-48 hours). Wire the fixture, secure the lamp head, and seal any openings with silicone.
Low-voltage pathway lights are DIY-friendly. Run 12-2 or 14-2 landscape wire from the transformer to each fixture location, burying cable 6 inches deep along the route. Most systems use quick-connect clips that pierce the cable insulation, no wire stripping required. Place the transformer near a GFCI-protected outlet, typically on an exterior wall or inside a garage. Many transformers include timers or photocells for automatic operation.
An emerging trend in luxury home design includes integrated smart controls for outdoor lighting. If you’re tech-inclined, consider fixtures compatible with Zigbee or Z-Wave hubs, or choose fixtures with built-in dusk-to-dawn sensors.
Bulb selection: If your fixture isn’t integrated LED, choose bulbs carefully. Standard A19 or A21 LED bulbs work in most sockets. For exposed-bulb fixtures where the lamp is visible, consider vintage-style LED filament bulbs in 2700K, they deliver the visual warmth of Edison bulbs without the 60-watt power draw. Avoid CFLs outdoors: cold weather degrades performance and lifespan.
Conclusion
Mid century outdoor lighting offers a rare combination, proven design that ages gracefully and practical functionality that modern LED technology has only improved. By focusing on authentic materials, correct proportions, and proper installation techniques, homeowners can achieve exterior lighting that elevates curb appeal and extends livable space into the evening hours. Whether restoring a period home or adding character to a newer build, the key is respecting the style’s core principles while adapting to contemporary performance standards.


