
Outdoor wall sconces do more than light up a doorway, they set the tone for your home’s exterior before visitors even knock. Modern designs have evolved far beyond the dated carriage lanterns many homeowners inherited with their houses. Today’s sconces balance clean lines, weather-resistant materials, and energy-efficient technology. Whether you’re replacing builder-grade fixtures or adding accent lighting to a bare facade, choosing the right modern sconce involves understanding current design trends, installation requirements, and long-term maintenance. This guide walks through everything needed to select, install, and care for outdoor wall sconces that elevate curb appeal without requiring a contractor.
Table of Contents
ToggleKey Takeaways
- Modern outdoor wall sconce lighting emphasizes geometric simplicity, weather-resistant materials, and energy-efficient LED technology to elevate curb appeal without requiring a contractor.
- Mount sconces at 60–66 inches from the floor and scale fixtures to 12–17 inches tall (or 18–24 inches for two-story entryways) to ensure proportional balance with your home’s architecture.
- LED bulbs are the practical choice for modern sconces, outlasting incandescent alternatives by 15,000–50,000 hours while consuming 75% less energy and eliminating frequent bulb replacements.
- DIYers can replace existing outdoor sconces in under an hour by shutting off power, matching wire colors (black to black, white to white, and ground to ground), and applying silicone caulk around the mounting plate for weather protection.
- Quarterly cleaning with a microfiber cloth, annual caulk seal inspections, and checking for corrosion or rust keep modern sconces functioning and looking sharp through seasonal exposure.
What Makes Outdoor Wall Sconce Lighting “Modern”?
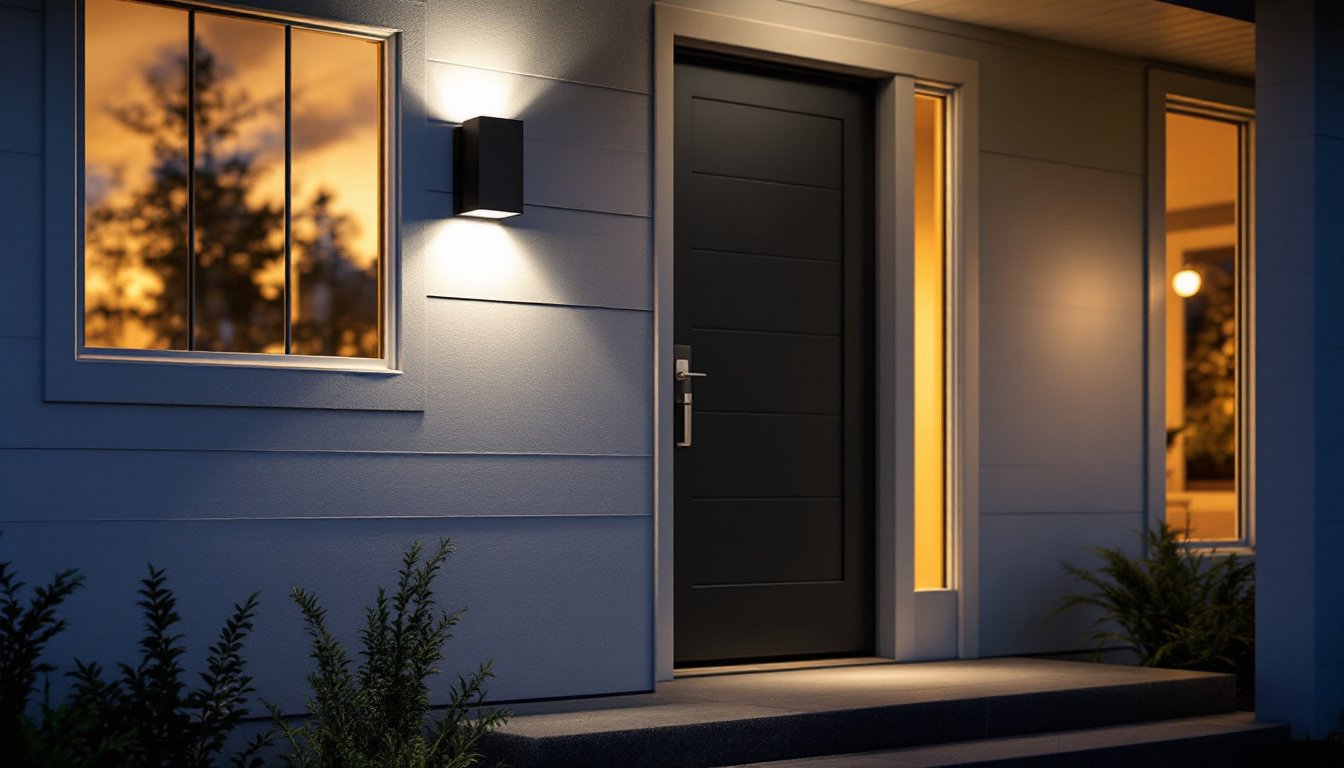
Modern outdoor sconces prioritize geometric simplicity and uncluttered profiles. Unlike traditional lantern styles with ornate scrollwork or faux candelabras, modern fixtures feature straight edges, cylindrical or rectangular housings, and minimal ornamentation. Materials lean toward matte black powder-coated aluminum, brushed nickel, or architectural bronze rather than polished brass.
Key characteristics include:
- Exposed LED arrays or diffused frosted glass panels instead of clear beveled panes
- Horizontal or vertical orientation that emphasizes linear form
- Integrated photocells or motion sensors built into the fixture body
- Weather ratings of IP65 or higher for true outdoor exposure
Many contemporary designs borrow from mid-century modern and industrial aesthetics. Box sconces with open bottoms that cast downward light pools are especially popular for minimalist exteriors. Cylindrical up/down sconces work well on modern farmhouse or Scandinavian-inspired homes.
The “modern” label also implies current electrical standards. Look for fixtures rated for wet locations (not just damp) if they’ll be exposed to direct rain. UL or ETL certification ensures the housing, wiring, and seals meet National Electrical Code requirements for outdoor use.
Where to Install Modern Outdoor Wall Sconces for Maximum Impact
Placement determines both function and visual balance. Sconces should provide task lighting for safe entry while accentuating architectural features.
Front entry doors: Mount one sconce on each side of the door at 60 to 66 inches from the finished floor to the center of the fixture. This height positions the light source at eye level for adults while keeping it above door handle reach. If the door has a wide surround or sidelights, adjust spacing so fixtures sit on the outer edge of the trim rather than crowding the door itself.
Garage doors: A single centered sconce works for single-car garages. Double or triple bays look more proportional with one fixture per bay or symmetrically placed pairs. Mount 6 to 12 inches from the garage door frame at the same 60–66-inch height.
Porch columns and corners: Sconces on porch posts create ambient lighting for outdoor seating areas. They also work as accent lighting on architectural details like stone or board-and-batten siding. For wraparound porches, space fixtures 8 to 10 feet apart to avoid dark pockets.
Pathways and side entrances: Low-profile sconces along fence lines or garage side doors improve safety without overwhelming smaller walls. Choose fixtures with downward-only light output to minimize glare.
Avoid placing sconces where they’ll shine directly into windows or create hotspots on reflective surfaces like vinyl siding. Step back 20 feet from your home at dusk to visualize coverage gaps before drilling.
Choosing the Right Size and Style for Your Home’s Architecture
Scale mismatches ruin otherwise solid design choices. A sconce that looks sleek in a product photo can read as either comically small or overbearing once mounted.
Proportional guidelines:
- For standard 8-foot ceilings and single doors, fixtures should measure 12 to 17 inches tall and 5 to 7 inches wide.
- On two-story entryways or homes with 10-foot+ ceilings, increase to 18 to 24 inches tall. Anything smaller disappears visually.
- The fixture’s projection (how far it sticks out from the wall) typically ranges from 4 to 8 inches. Deeper projection creates more dramatic shadows but may interfere with door swings or narrow walkways.
Architectural matching:
- Mid-century modern homes: Choose sconces with globe diffusers, tapered cones, or sputnik-inspired arms. Warm brass or oil-rubbed bronze complements wood siding and stone accents.
- Contemporary and minimalist: Box sconces with sharp 90-degree angles and matte black or gray finishes echo clean lines. Integrated LED strips within the housing eliminate visible bulbs entirely.
- Modern farmhouse: Cage-style sconces or simple barn lights in black work without veering into rustic territory. Pair with Edison-style LED bulbs (covered in the next section) for a softer glow.
- Coastal or transitional: Cylindrical sconces in brushed nickel or white powder coat suit homes with clean design aesthetics and neutral palettes.
Test scale by taping cardboard cutouts to the wall at the planned height. View from the street and walkway to confirm proportions before ordering.
LED vs. Traditional Bulbs: Which Is Best for Modern Sconces?
LED bulbs are the practical default for outdoor sconces in 2026. They outlast incandescent and CFL alternatives by 15,000 to 50,000 hours and consume 75% less energy. Most modern fixtures now come with integrated LED modules rather than standard sockets, eliminating bulb replacements for a decade or more.
Advantages of integrated LEDs:
- Consistent color temperature across all fixtures (no mismatched warm vs. cool tones)
- Dimmer profiles designed specifically for the fixture’s driver
- Slimmer housing designs since there’s no need for bulb clearance
The downside: when the LED array fails, the entire fixture often needs replacement. Modular designs that allow driver or LED board swaps exist but cost more upfront.
Replaceable LED bulbs offer flexibility. Choose A19 or A21 bulbs for standard sockets, or candelabra base (E12) for smaller fixtures. Look for:
- 800 to 1100 lumens for entry lighting (equivalent to 60–75W incandescent)
- 2700K to 3000K color temperature for warm white that doesn’t cast harsh blue tones
- Damp or wet-rated bulbs if the fixture has open ventilation
CFL and incandescent bulbs still work in older fixtures but dim slowly in cold weather and require frequent replacement. Halogen bulbs produce excellent color rendering but generate excessive heat that can warp plastic housings or trip thermal sensors.
For sconces on dimmer switches, verify the LED bulb or driver is labeled “dimmable.” Not all LEDs handle phase-cut dimmers without flickering. Lutron and Leviton both publish compatibility charts for their dimmer models.
Step-by-Step Installation Guide for Outdoor Wall Sconces
Replacing an existing outdoor light is a straightforward project for DIYers comfortable with basic electrical work. Installing a sconce where none existed requires running new wiring, consider hiring a licensed electrician if you’re unfamiliar with breaker panels or NEC Article 110 outdoor wiring standards. Most jurisdictions require permits for new outdoor circuits.
Tools and materials:
- Voltage tester (non-contact and two-lead tester)
- Wire stripper
- Screwdriver set (Phillips and flathead)
- Drill with masonry or wood bit (depends on siding)
- Exterior-rated wire nuts and silicone caulk
- Ladder rated for your working height
Safety PPE: Safety glasses, gloves, and rubber-soled shoes.
Installation steps:
- Shut off power at the breaker. Use a voltage tester on the existing fixture’s wires to confirm no current.
- Remove the old fixture. Unscrew the mounting plate and disconnect wire nuts. Note wire colors: black (hot), white (neutral), green or bare copper (ground).
- Inspect the junction box. Outdoor boxes should be weatherproof with a gasketed cover or foam seal. If the existing box is rusted or loose, replace it with a weather-rated metal or plastic junction box rated for 50+ pounds if the new fixture is heavy.
- Attach the mounting bracket from the new sconce to the junction box using the provided screws. Most modern fixtures use a crossbar mount with threaded studs.
- Connect wires. Match black to black, white to white, and ground to ground using wire nuts. Tuck connections neatly into the box, overcrowding can prevent the fixture from sitting flush.
- Secure the fixture to the mounting bracket. Some sconces use cap nuts on threaded posts: others screw directly into the crossbar.
- Apply silicone caulk around the top and sides of the mounting plate where it meets the wall. Leave the bottom open for drainage, trapped moisture causes rust and short circuits.
- Restore power and test. If the fixture doesn’t light, recheck wire connections and confirm the bulb is seated properly.
For homes with vinyl or fiber cement siding, drill pilot holes slightly smaller than the screw diameter to prevent cracking. On brick or stucco, use a masonry bit and plastic anchors rated for outdoor exposure. A helper steadying the ladder and holding the fixture during final attachment makes the job safer and faster.
If your sconce includes a photocell or motion sensor, follow the manufacturer’s wiring diagram, most add a third (red or yellow) wire that connects to the hot lead.
Maintenance Tips to Keep Your Modern Sconces Looking New
Outdoor fixtures face UV exposure, temperature swings, and moisture intrusion. Routine upkeep extends lifespan and prevents corrosion.
Quarterly cleaning:
- Wipe down the housing with a damp microfiber cloth and mild dish soap. Avoid abrasive cleaners that scratch powder-coated finishes.
- Remove bugs and debris from diffusers and vents. Trapped insects block light output and can create hot spots.
- Check mounting screws for looseness. Vibrations from wind or door slams can back screws out over time.
Annual inspection:
- Inspect caulk seals around the mounting plate. Reapply silicone if gaps or cracks appear.
- Test motion sensors and photocells by covering the sensor lens, lights should activate immediately. Replace faulty sensors per manufacturer instructions.
- Look for rust or corrosion on metal components, especially around screw holes. Wire brush small spots and apply rust-inhibiting spray paint matched to the fixture finish.
Bulb and LED care:
Replaceable bulbs dim over time. Swap them when light output drops noticeably, usually after 2,000 to 3,000 hours for LEDs. For integrated LED fixtures, note the installation date. Most manufacturers warranty LED arrays for 5 to 10 years.
Winter considerations:
In regions with freezing temperatures, ensure fixtures rated for your climate zone. Water infiltration expands when frozen, cracking plastic lenses and housings. If a fixture accumulates ice, let it thaw naturally, applying heat can warp components.
Modern finishes hold up well, but outdoor elements demand regular attention to prevent premature wear. A quick once-over each season keeps sconces functioning and looking sharp.
Conclusion
Modern outdoor wall sconces deliver curb appeal and functional lighting when chosen and installed correctly. Focus on proportional sizing, weather-appropriate ratings, and proper placement height to avoid common pitfalls. LED technology reduces long-term maintenance, while routine cleaning and seal inspections keep fixtures performing through seasons of exposure. Whether replacing outdated lanterns or adding accent lighting, these upgrades offer immediate visual impact, and most installs take less than an hour per fixture.


